Deprecated: Using null as an array offset is deprecated, use an empty string instead in /home/pa-syco/public_html/runebrush/wp-includes/class-wp-block-type-registry.php on line 168
Deprecated: Using null as an array offset is deprecated, use an empty string instead in /home/pa-syco/public_html/runebrush/wp-includes/class-wp-block-type-registry.php on line 168
Deprecated: Using null as an array offset is deprecated, use an empty string instead in /home/pa-syco/public_html/runebrush/wp-includes/class-wp-block-type-registry.php on line 168
Deprecated: Using null as an array offset is deprecated, use an empty string instead in /home/pa-syco/public_html/runebrush/wp-includes/class-wp-block-type-registry.php on line 168
Deprecated: Using null as an array offset is deprecated, use an empty string instead in /home/pa-syco/public_html/runebrush/wp-includes/class-wp-block.php on line 257
Deprecated: Using null as an array offset is deprecated, use an empty string instead in /home/pa-syco/public_html/runebrush/wp-includes/class-wp-block-type-registry.php on line 168
Deprecated: Using null as an array offset is deprecated, use an empty string instead in /home/pa-syco/public_html/runebrush/wp-includes/class-wp-block-type-registry.php on line 168
Deprecated: Using null as an array offset is deprecated, use an empty string instead in /home/pa-syco/public_html/runebrush/wp-includes/class-wp-block-type-registry.php on line 168
Deprecated: Using null as an array offset is deprecated, use an empty string instead in /home/pa-syco/public_html/runebrush/wp-includes/class-wp-block-type-registry.php on line 168
Deprecated: Using null as an array offset is deprecated, use an empty string instead in /home/pa-syco/public_html/runebrush/wp-includes/class-wp-block-type-registry.php on line 168
With the temperature in the UK dropping, I’ve picked up a product to try and help me to reliably 3d print during these cold winter days. This post is my review of the ThermalVATBAND
First a couple of disclaimers. I’ve bought this product myself and am in no way affiliated with ThermalVATBAND. This product is entirely optional, you don’t need it, so please don’t go out and pick one up thinking I’m an expert and it’ll solve all your problems. Lastly, apologies on the length of this review!
Resin 3d printing can at times be exceptionally fickle and is susceptible to a plethora of factors that can contribute towards a successful or failed 3d print. Having done a bit of printing now, the biggest factor I’ve been finding is temperature – specifically, cold temperatures that make the resin more viscous and also seems to have an impact on how the resin behaves. The vast majority of 3d printer resins have a working temperature of between 20°C and 30°C, however this is an exceptionally tough temperature to achieve naturally in some locations in the world – in the UK the ambient temperature might reach that for perhaps a handful of weeks in the year. This becomes even more challenging when you’re printing overnight and potentially in your (normally) unheated garage – which is coincidently where I have my printer set up.
I’d found I was having more partly failed prints as the temperature dropped below 15°C and knew this was only going to get worse as it got colder. Having a hunt around I made the decision to pick up a ThermalVATBAND. This product is an America invention, so I used a third party in the form of Severn View Hobbies to pick one up within the UK. First off, this product isn’t particularly cheap, coming in just over the £50 mark by the time you factor in postage. In the US it it’s priced around $40 so we’re talking a tidy mark up. I ordered it on a Friday morning and got dispatch on the following Monday with arrival on Wednesday – so it wasn’t particularly speedy, but equally I wasn’t waiting ages.
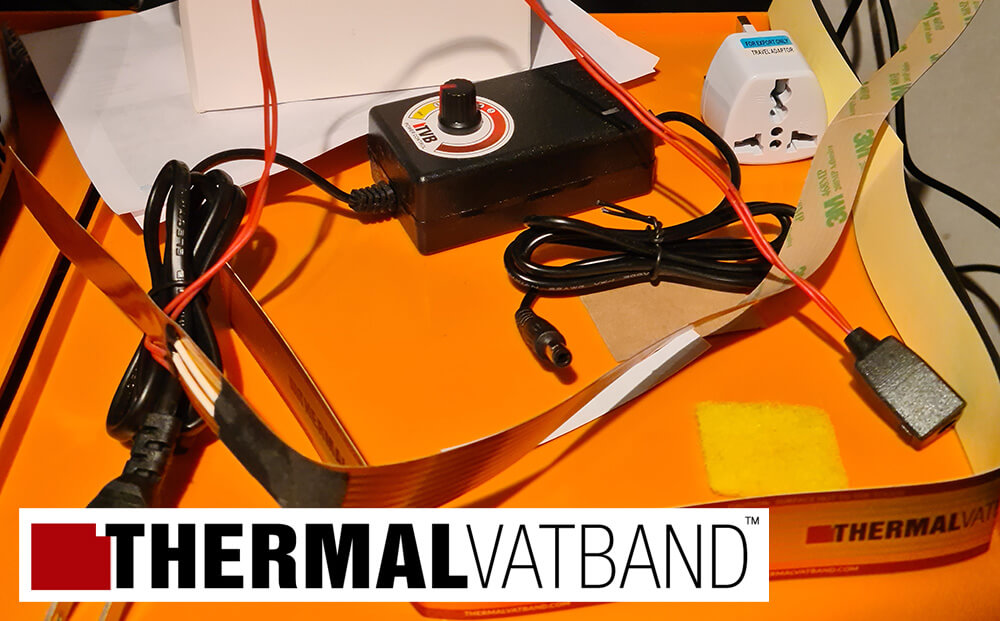
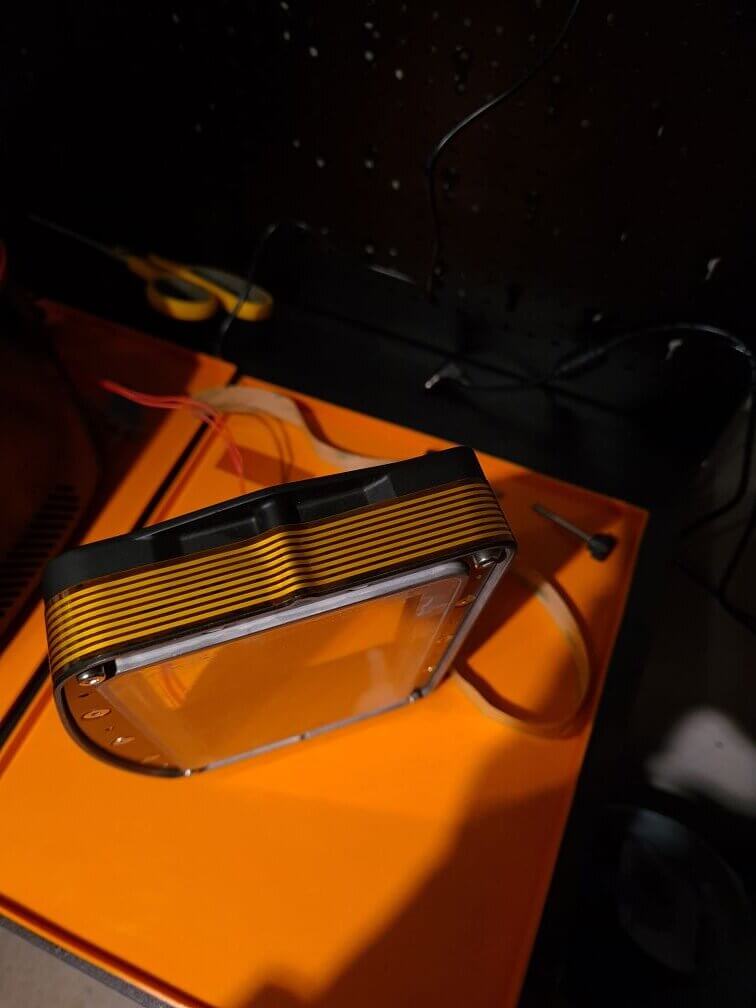
To quickly explain, this product is a self-adhesive band containing a heating element that you stick around your vat. This heats up the vat and contents and incorporates a thermostat to regular the temperature.
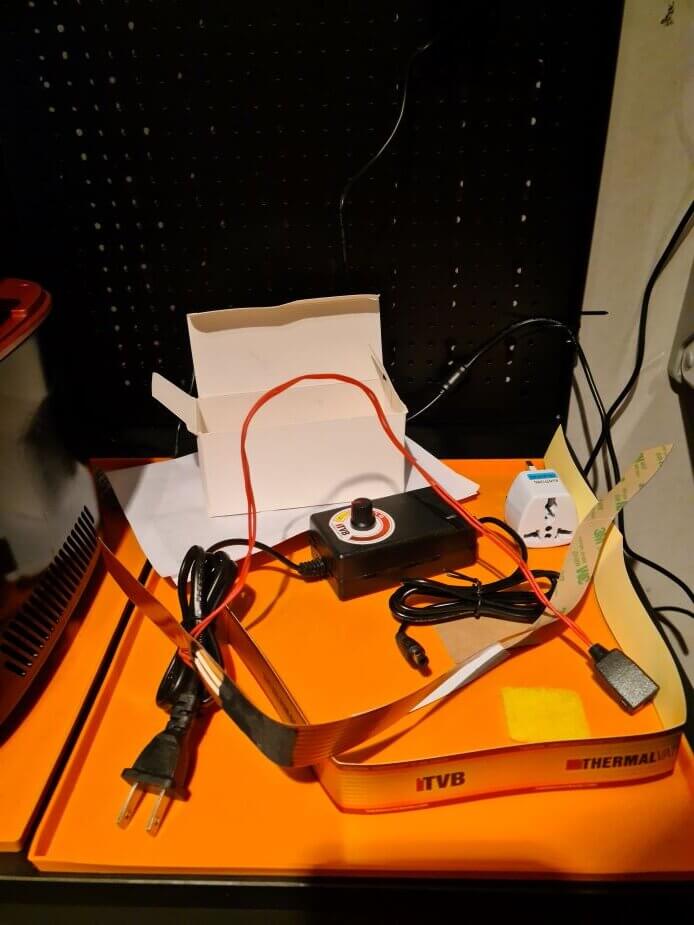
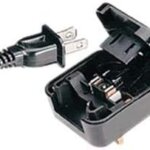 I have to speak as I find, and the contents felt like a handful of components chucked into the box with an invoice in the bottom. No piece of paper or business card with “visit this website for instructions” or information other than what I’d paid. The next item I had an issue was the Adjustable Power Adapter which has a US plug on it and is supplied with a US to UK adapter. However it’s an unfused travel adapter that has no shutters on the Live or Neutral contacts – there’s no easy way to say this, but legislation has existed in the UK for many years that prohibits these from being sold because they don’t meet minimum safety standards. This needed to be a proper fused plug converter added to the end (as pictured to the right).
It’s a real shame as the quality of the actual band components feel really good, the adhesive tape used is 3M rather than an unnamed brand and the branded strip of aluminium tape to protect the element from splashes is pretty decent. It looks as if the effort has been put into the band itself rather than the “package” you were ordering, which I suppose is preferable to the other way round.
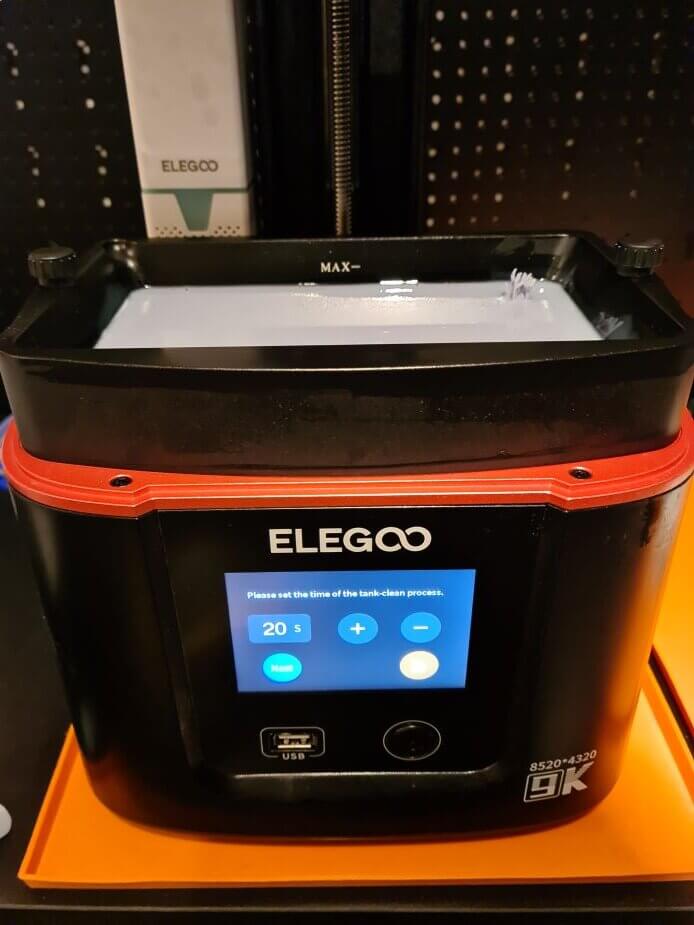
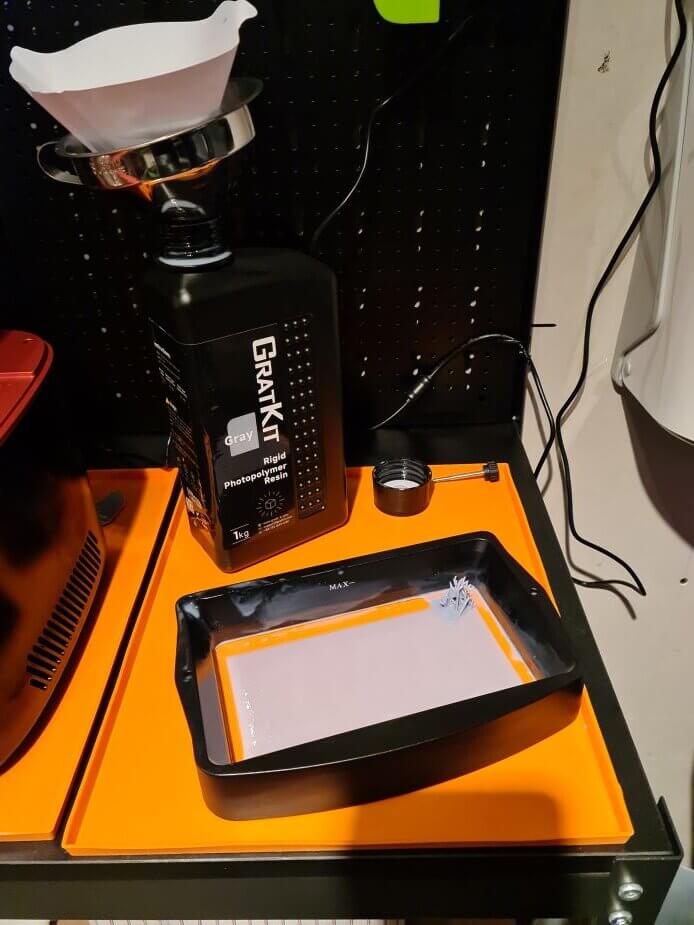 Installation itself isn’t too complex. First port of call (after turning a small oil filled radiator on as it was flipping chilly) was to empty my vat. On my Mars 4, I do this by gently putting a waste piece of support in the corner and then running the “tank clean” option for about 20 seconds. This blasts the entire vat with UV light and cures a thin layer on the FEP. Using a funnel and spatula I poured the excess resin back into the bottle and then gave the support a gentle tug to peel off the cured resin sheet from the FEP. This should give you a fairly clean vat to work with – certainly enough you’ve not resin dribbling everywhere!
Using the provided scouring pad and some alcohol, I gave the outside of the vat a really good clean as we don’t want any residual resin where we want to stick the vat band. My Mars 4 has a metal vat, which means you can safely use IPA to clean it and the scourer isn’t harsh enough to damage the powder coating. A quick wipe with a microfibre cloth and all I had to do was let it dry fully.
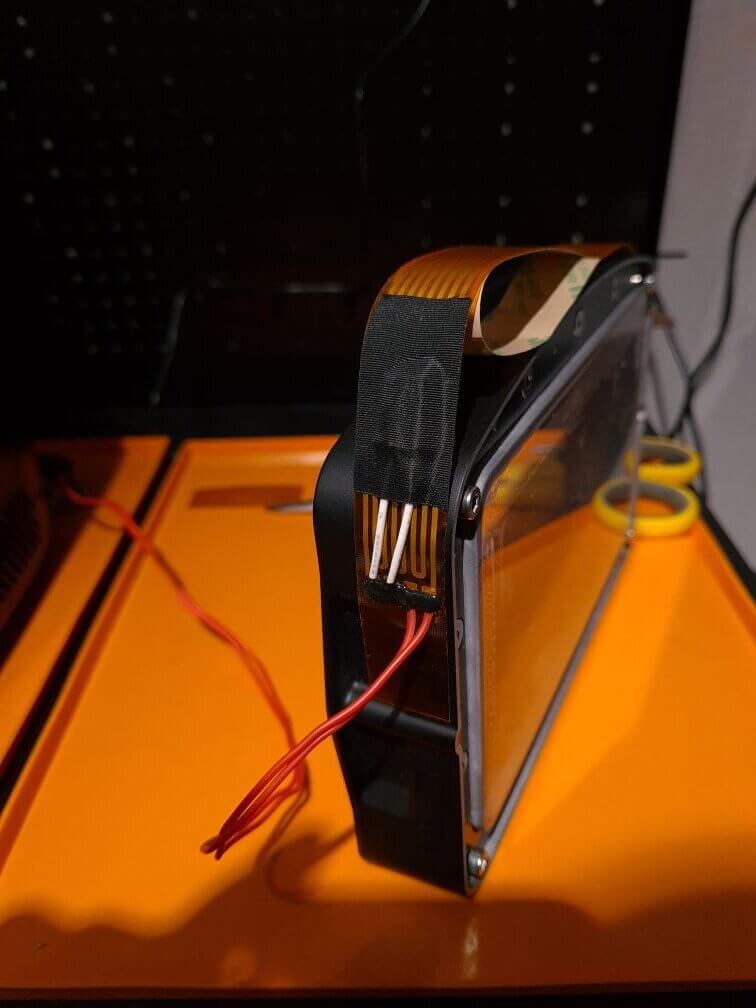
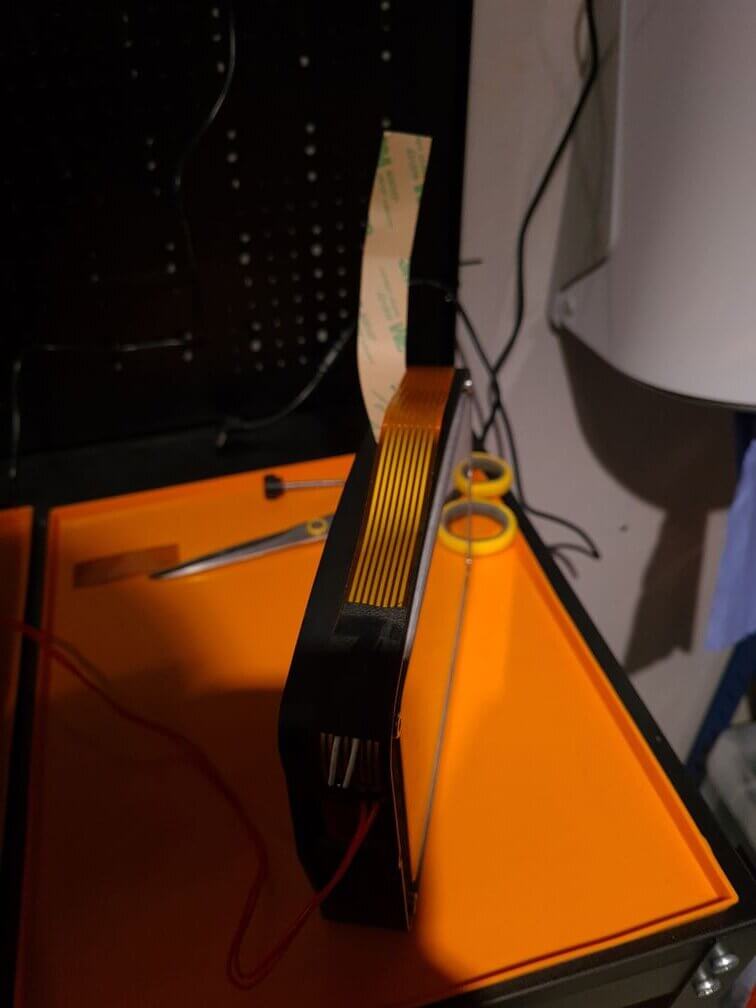
Now there is a fairly good YouTube video on how to install the band, in simple terms work out if you need to install it flush with the top or bottom of your vat (Mars 4 is bottom), start the thermostat end and then carefully stick it in place, working round and stretching it round all the curves of the vat. Only peel a portion of the backing tape off at a time and pull it tight around corners as there’s a little bit of stretch to it. I did cut a couple of inches off start where there wasn’t any element so that it sat flatter there.
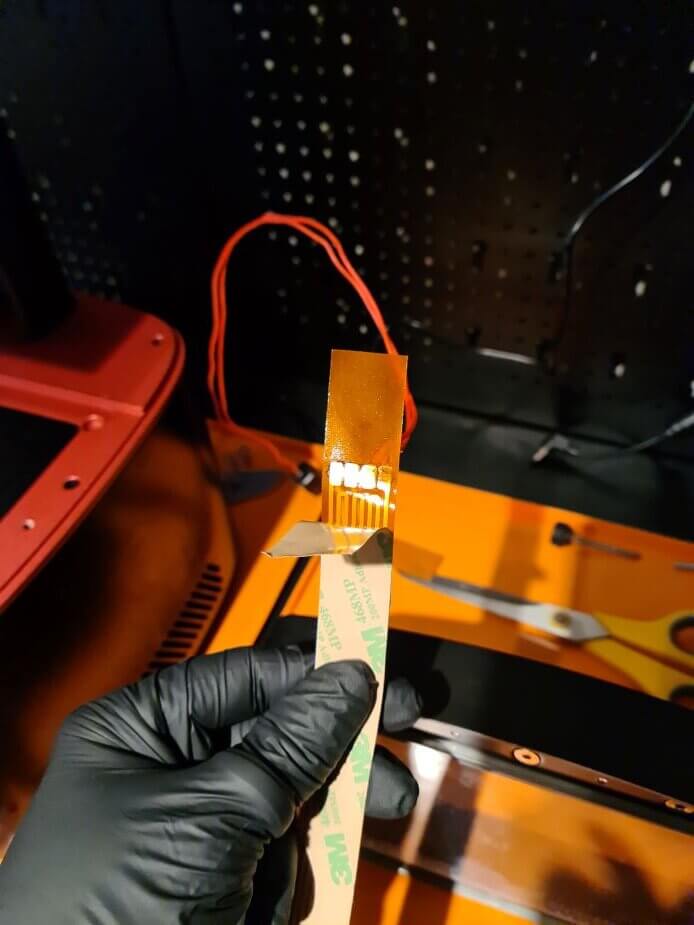
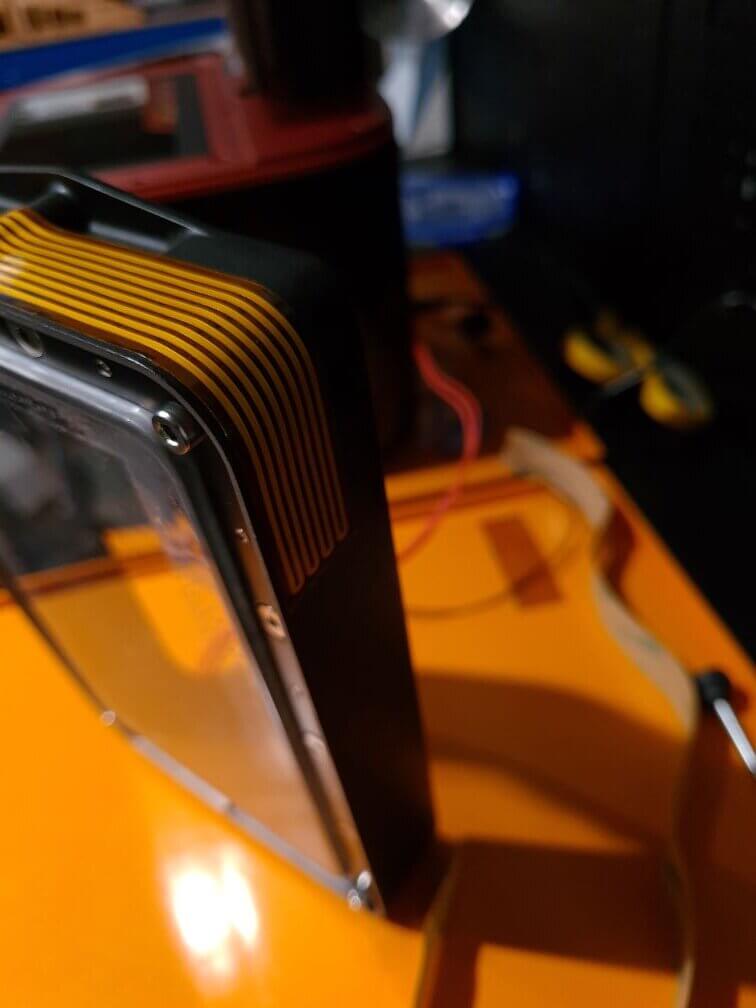
 Now one thing that isn’t really covered in the video is that the aluminium tape provided is designed to protect the element from resin drips, it also helps to spread the heat if you have a plastic vat. This doesn’t have quite as much stretch as the band itself so I did find I got a couple of wrinkles – I’m hoping they’ll level out once the band has been heated up a few times.
And with that, the band was installed. It took me a little over thirty minutes and that included taking photos for this review and draining the vat. It was pretty pain free, as with anything like this you need to take things slowly. Watching the installation video is also pretty mandatory for this product too because there aren’t any other instructions.
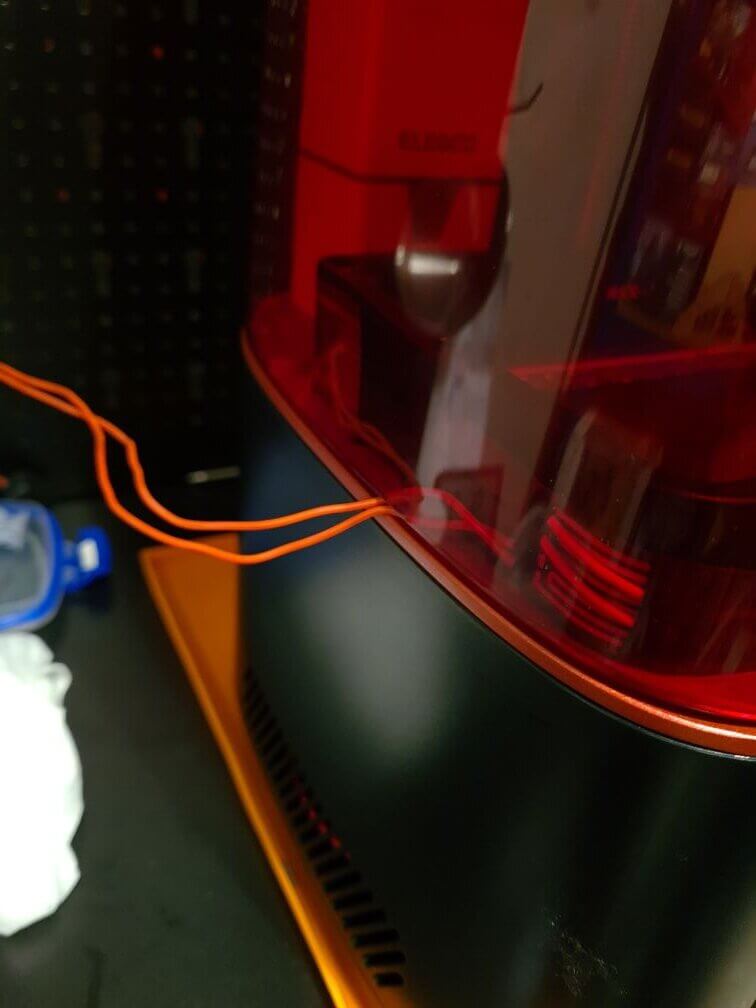 Probably my biggest frustration is that the power wire for the band means the lid no longer sits on flat as the wire crates a small gap. Because the Mars 4 is a small printer, there also wasn’t enough space to run them down the side of the vat and out of the back which means the only option is they have to spring out from the side, thankfully the area to the left of my printer is where I keep my things for easy access, so the wire shouldn’t interfere with anything.
There are a few bits you can do to make the lid sit flat again: cutting a small nub into the lid; FDM printing a riser out; or using foam tape around the edge with a gap in for the wire. Depending on your set up the gap may cause light to bleed into your printer, so you might have to do this on your printer.
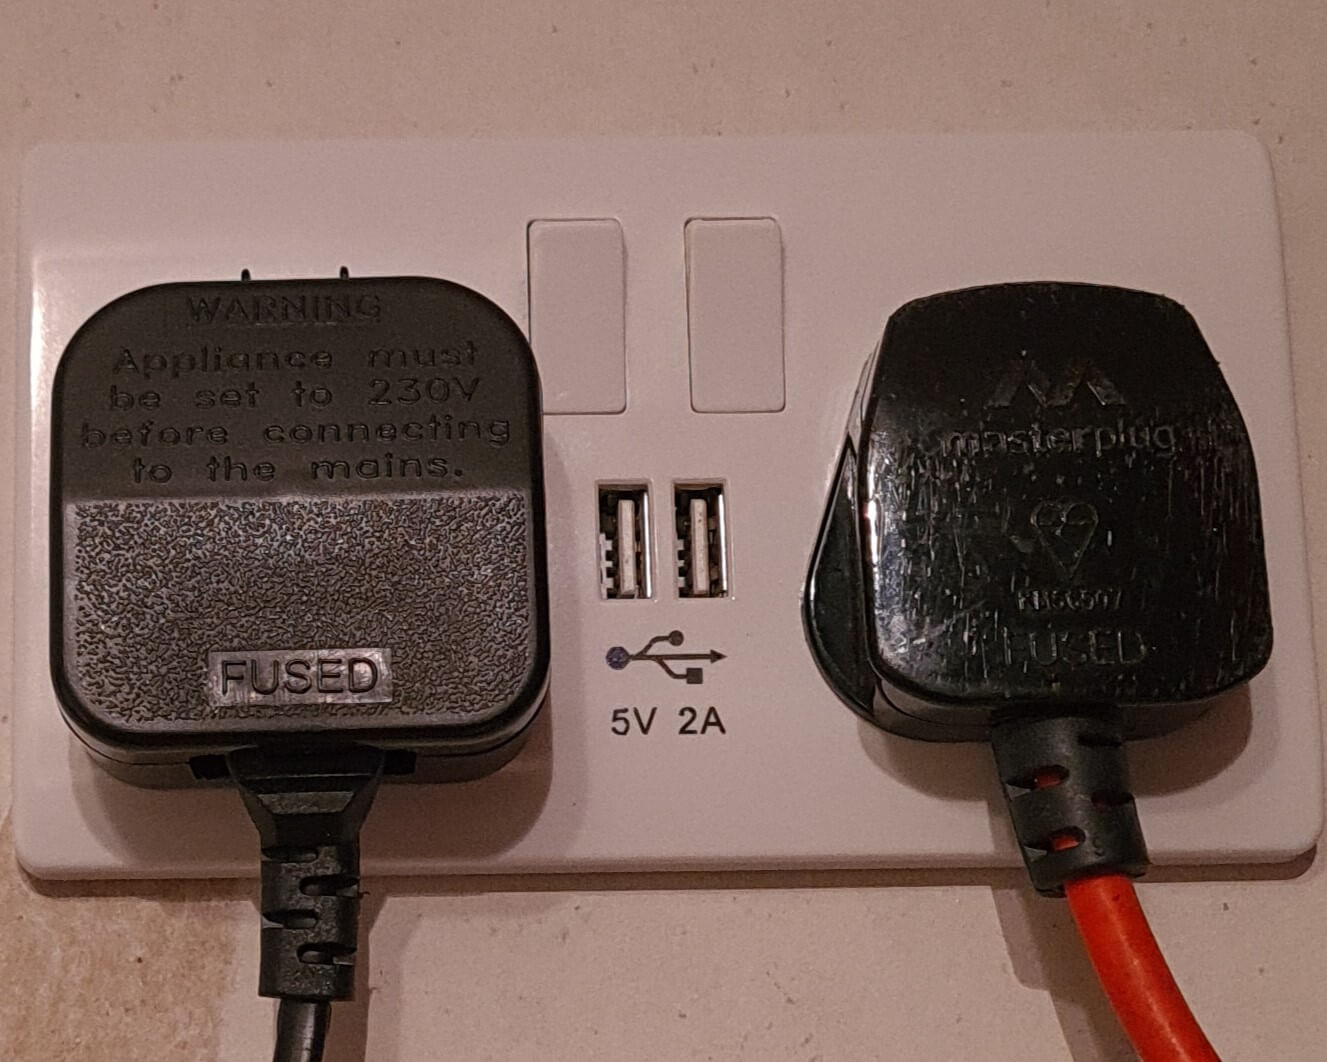
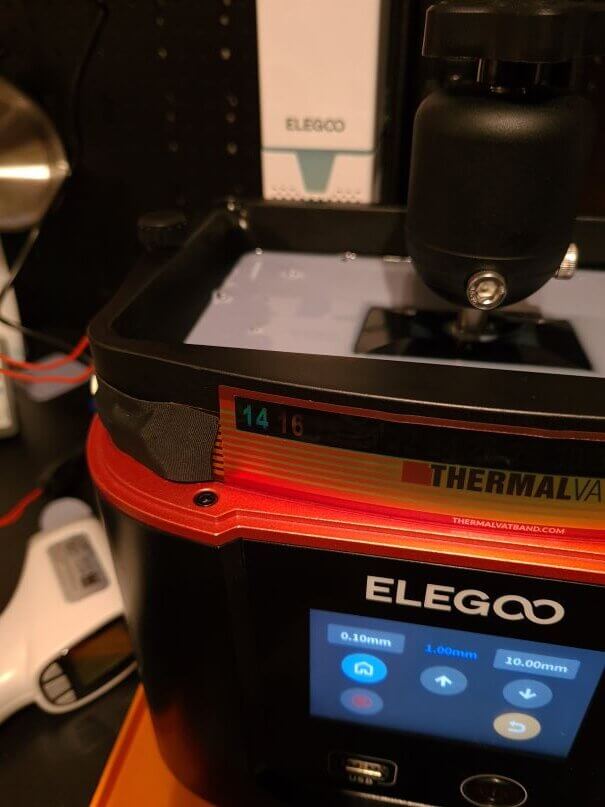 Because I’d not realised how bad the travel adapter was, I wasn’t able to test the band until the next day when a converter plug I’d ordered arrived arrived – as you can see the plug is much neater and safer now. Putting my trusty heater on again, I filled up my vat, lowered my build plate into it and then turned the band on. The resin started off at a chilly 11°C with the band thermometer showing under 14°C. I’m not entirely sure of the accuracy of either my IR thermometer or the stick on band – however I’m not baking a cake, so a rough indication is good enough. Initially I started off on Power 2 on the controller which began to slowly bring the vat up to temperature, but I bumped it up to Power 3 after about ten minutes which seems like the better option from a cold start. After about half an hour, the resin was around 18°C, which I felt was warm enough to start an hour print off – I turned it down to Power 2 and started a print of around an hour.
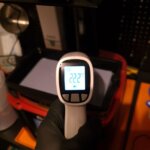 I’m happy to say that the print came out without any issues at all, the final temperature of the resin was around 22°C, which although on the lower side of things is comfortably within the working temperature range of the resin I was using. It certainly made the resin a lot more fluid. When I drained the vat, the resin had gone from a thick whipping cream consistency to a loose single cream. The only thing that I did notice is that the tape holding the thermostat in place had come slightly unstuck, pulling the thermostat away a little. This will cause the band to get a bit hotter, however I didn’t notice any overheating of the resin – but is certainly something I’ll keep an eye on when I do a longer print though.
For the future, I think my plan will be to turn the ThermalVATBAND on at Power 3 roughly 30 minutes before I want to print, then turn it down to Power 2 when I start the print off. I also think I’ll raise the bed from the resin when I turn the power down and give the resin a quick stir, the band doesn’t go all the way around the vat, so there are going to be hot and cold points.
Summary
Overall this one upgrade will mean that I can 3d print in the depths of winter in my garage with a lower risk of print failure. Yes it will cost me some electricity and has sunk me another £50 for the band, but in the long term I will save that on failed prints and would otherwise mean the printer is sat idle for half the year.
The band itself is great, really nice quality and bespoke for the purpose. The adjustable power adapter really lets it down, not only does it have a US plug with unsafe travel adapter, but according to the website you shouldn’t use exceed power level 3. This really needs to have a note in the product or better still have the “max” next to the 3. The overall package itself also could do with a bit more effort being put into it, I recently picked up a Wham Bam flexible plate which was around the same price point and this felt much more like a self-contained product with instructions on how to get going.
Overall I like the ThermalVATBAND for my Mars 4 9k. Being a small format printer, the neater and bespoke nature of the band in my view makes it a good solution for me to solve the issue of colder temperatures. Unlike other options, it’s designed for being left on during a print run without causing issues which is also another plus point. The vat band looks fine, but is a little ugly, adding wires and warning symbols over the previously plain smart black vat.
I do think that heated vats and built plates should really be being made by the manufacturers – there’s no reason why an element couldn’t be cast into the metal vat and powered via an induction loop to keep things safe. It could even be an optional extra and I suspect most people would happily drop a chunk of change for this – I certainly did for this product. However until such time as this happens, my view is this band will be one of the better options available.
What isn’t made obvious
Probably my biggest gripe is that there isn’t a huge amount of information on installing and even less on using the ThermalVATBAND. I’ve tried to collate all of the important bits below
- If you’re in the UK, buy a US to UK fused plug converter as pictured above, the one provided is basically unsafe and shouldn’t be being sold in the country
- When fitting, empty the vat and clean where you’re sticking the band using the scouring pad provided
- Go slow and steady when putting the band in place and don’t be afraid to peel back a bit to get it right
- The first time you power the band, the heat will help to make the band stick more securely, this also means that installing it in the cold will mean less stick so it’s easier to re-position
- The branded aluminium tape is intended to protect it from spills and provide a bit more heat spread
- Even when unplugged you will have around 6~8 inches of wire dangling from the band. Think about your work flow so that this interferes the least when emptying the vat. Apparently there is a magnetic quick release option, but I couldn’t really find much information out about it, but also suspect it wouldn’t have fitted under my lid
- DO NOT go above power 3 on the adjustable power supply as it can trip out the power supply – it’ll sort itself out, but worth bearing in mind if you notice the light flicking on and off when not up to temperature
- The base plate needs to be sat within your resin whilst you’re heating the vat up else it’ll act as a giant ice cube
- Keep your bottles of resin indoors during the winter, will help keep the chill off the resin so when you top the vat up you’re not dropping the temperature too much
- Use an Infrared thermometer to work out the temperature of the resin, the thermometer sticker supplied shows you the temperature of the band rather than the resin
- Start off with the dial turned on setting 2 and work up/down from there in 10 minute time frames
- A metal vat will take longer to warm up but will retain the heat, a plastic vat doesn’t retain any heat so you’ll need the band on lower and longer and need to use aluminium tape to retain and distribute the heat
- The vat band has a limit on how hot it can get – it’s designed so you can leave it unattended for a print run
- Once set up, consider recalibrating the printer because a better temperature resin may mean a reduction in base and exposure times
- The Adjustable Power Supply controls the amount of power the band receives, and there is then a thermostat that turns the power on and off. This means the power supply controls the speed of heat and not the maximum temperature – slow and steady is better than fast and choppy. You can unpeel the thermostat and move it away from the band if it doesn’t get warm enough