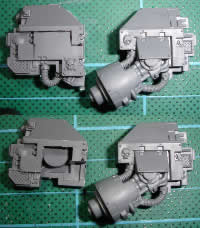
 The first of a couple of pictures. This one shows my progress on converting the lascanon arm of the plastic Dreadnought into a heavy bolter arm. My concept is to mimic the close combat arm with its flap pivot and elbow.
It still needs a fair bit of work and significant filling. The elbow joint may also be fun and games as plastic disc’s aren’t a common thing to have lying around.
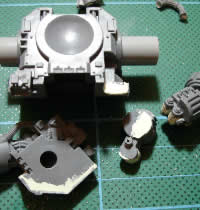
 Next up is a quick round up of my initial rough fill. The putty is a mix of green stuff and standard milliput, however in this case I didn’t quite have enough green sutff in the mix and it didn’t adhear quite as well as normal. The picture is deceptive, its not as smooth in some areas as it looks. The basic concept is that I make sure that all deep gaps and large areas are filled in. Tomorrow, once this is rock solid, I can trim the excess off and file areas flat. At least one more fill will be required as areas won’t be filled enough, or I’ll over file. Later on, some gaps will be filled with pure green stuff, but these large areas need to end up as if they were actually part of the model itself.
Running Totals: Time – ~ 13 Hrs; Cost – £36.47
Quite a positive start to the heavy bolter arm. The shoulder needs the slot widening towards the back and the ‘flap’ cut from a piece of thick plasti-card. I’m going to have a rummage in my bits box in order to find something that can be used as an elbow joint. If push comes to shove I suppose that I could cut a piece of plastic pipe and fill it, but this would be my last option if possible. Once I have that I can then fix the plastic tube I’ll use for the upper and lower arm and look at how I can fix it to the shoulder.
One thing that does currently concern me is how I am going to rivet the whole model. I have a number of tiny ball bearings (0.79mm) that work fantastically as rivets. Basically drill a shallow hole with a fine drill bit and super glue the ball bearing in. What I have a problem with is drilling the holes perfectly. One out of line rivet will just make the whole model look naff, regardless of how well it’s been painted or how the rest of it looks. A pillar drill would help with this as it removes some of the issues with drilling, but the cheapest I can seem to find it is £32 including postage, which is quite a bit of money and wouldn’t guarantee perfect rivets. One thing that has just occurred is that many of these fine rivets will be in the edging that will be made from plastic strip. I could potentially pre-drill the strips before I glue them on – that way if I mess it up, it doesn’t matter.
I will be adding ‘pyramid’ studs over the model as well, which I currently plan to do by making a press mold. Basically I’ll take a piece of plastic (sprue or similar) and cut/file it into the shape I’m after. I’ll then pack a piece of tube with a milliput/green stuff mix and press the point of my spikey plastic into it. When this is set it can be used to turn a little piece of green stuff into a stud. A little bit of grease carefully applied to the mold will prevent the green stuff from sticking to it – pretty simple.
My next list of tasks is pretty short, but isn’t a two minute job. I need to file and trim the filling I’ve just done. I then need to cut the two textured panels for the front of the torso. Doing a quick doodle, I think that the ribbing will look best going straight left to right, rather than following the slight gradient on the top armour (this is actually easier to cut as well!). This then needs to be glued into place and I need to do a second fill of all items as necessary. I may also have a go at doing the top panels.