Deprecated: Using null as an array offset is deprecated, use an empty string instead in /home/pa-syco/public_html/runebrush/wp-includes/class-wp-block-type-registry.php on line 168
Deprecated: Using null as an array offset is deprecated, use an empty string instead in /home/pa-syco/public_html/runebrush/wp-includes/class-wp-block-type-registry.php on line 168
Deprecated: Using null as an array offset is deprecated, use an empty string instead in /home/pa-syco/public_html/runebrush/wp-includes/class-wp-block-type-registry.php on line 168
Deprecated: Using null as an array offset is deprecated, use an empty string instead in /home/pa-syco/public_html/runebrush/wp-includes/class-wp-block-type-registry.php on line 168
Deprecated: Using null as an array offset is deprecated, use an empty string instead in /home/pa-syco/public_html/runebrush/wp-includes/class-wp-block.php on line 257
Deprecated: Using null as an array offset is deprecated, use an empty string instead in /home/pa-syco/public_html/runebrush/wp-includes/class-wp-block-type-registry.php on line 168
Deprecated: Using null as an array offset is deprecated, use an empty string instead in /home/pa-syco/public_html/runebrush/wp-includes/class-wp-block-type-registry.php on line 168
Deprecated: Using null as an array offset is deprecated, use an empty string instead in /home/pa-syco/public_html/runebrush/wp-includes/class-wp-block-type-registry.php on line 168
Deprecated: Using null as an array offset is deprecated, use an empty string instead in /home/pa-syco/public_html/runebrush/wp-includes/class-wp-block-type-registry.php on line 168
Deprecated: Using null as an array offset is deprecated, use an empty string instead in /home/pa-syco/public_html/runebrush/wp-includes/class-wp-block-type-registry.php on line 168
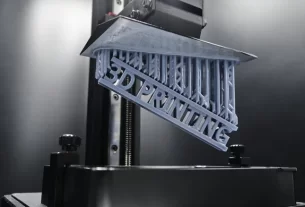
If you’ve been following my journey on 3d printing, you’ll know that I successfully printed out a prototype Epic base with a magnet hole. This post is going to be a little different and to be a theoretical one, so please feel free to skip it and await post 4 where I’ll show off some more prints and designs!
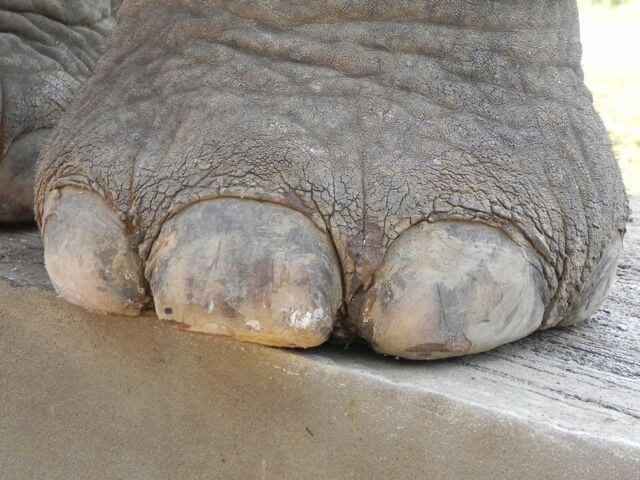
Myth Dispel 3: Elephant Foot is caused by over exposure
In nearly all articles on YouTube and in blogs, you’ll be given the direction that the first handful of layers of a print (aka base or burn in layers) need to be exposed for a high duration of 20~30 seconds. Resin manufacturers even state this high exposure value on their datasheets. This overexposes the resin and ensures the print is fixed to the build plate, but causes an elephants foot effect where the UV “bleeds” and cures a larger amount.
In short this isn’t correct. The elephants foot blooming is caused in the first layers because when the build plate comes down it tries to displace the resin underneath it. The resin resists this displacement, causing there to be a thicker layer of resin between the build plate and fep (a combination of fep flex and build plate being resisted).
Given enough time the resin will get squeezed out, causing the build plate to settle to the correct place and the fep to relax flat. Because we normally start to blast the resin with UV straight away, we get resin curing from the fep up so the resin by the build plate is still liquid, over the 20~30 seconds of exposure the liquid resin gets squeezed out and will drag partly cured resin with it, causing the ballooning effect – a bit like liquid magma will take the cooled crust some distance before stopping.
 Well, there we have it. The real cause of elephants foot and one that if you think about it, this makes a huge amount of sense. Before I go off at too much of a tangent, I’m going to cite my source! This came from the Table Flip Foundry Discord following a post by ‘aWildTomAppears’ and a series of posts by Jan Mrázek on his blog. I’ll point to a couple of other posts on this blog during the course of this post. I will also add that this “theory”, does divide the community a little bit as it’s a new idea and some of the items can be seen as slightly subjective.
But, in summary, the main factors in play here are how firmly your base plate comes down (that’s speed and force), the viscosity of your resin (or thickness) and how tight your fep is. The key point is that this can cause a huge discrepancy in layer height for those first layers and Jan’s investigations suggest that it’s not until the base plate is 1mm ~ 2mm above the first layer that this no longer happens (or more likely the effect is negligible). It may be confirmation bias, but certainly the elephant foot effect on my first print was for present in the first 1mm or so.
This explanation also explains why temperature makes so much difference. How many times have you read that a print has failed due to it being cold? Cold temperatures causes the resin to become more viscous, causing the resin to resist displacement more, and causing a greater deviation in layer height, to the point where the resin touching the base plate hasn’t cured properly and you may end up with delamination. Added to this, all resins only cure to a certain depth to prevent something called cross curing.
There is a solution to the elephants foot though. After the build plate comes down, we need to wait until the resin has displaced before we start to cure. That could well be anything between 20 and 60 seconds depending upon the resin being used and temperature etc. Slicing software offers a ‘time before cure’ setting for the base layers and normal layers, however it doesn’t quite deliver what we need as we want it to affect the first 1mm or so of the print. Our base layers are likely going to be just a fraction of this and having this on normal layers is going to just extend the print time to an unacceptable level. Jan has however found the solution using UVTools.
 If you’ve not used UVTools, it’s basically a post-processor for sliced files. You slice your object using your normal slicer and then open it up in UVTools. From here the software will allow you to determine any problems such as unsupported islands and also modify the print settings on individual layers. I’ll not go into the specific settings here (Jan has this covered already, though his settings didn’t work for my printer). If enough people are interested, I’m tempted to do a video at some point. Suffice to say, Jan and the developer of UVTools have hooked up the ability to modify the first X mm worth of layers, adding wait times onto them. Now this will add ~ 15 minutes on per print (more at lower layer heights), however it should mean you only need a couple of base layers and your prints should come out without any elephant foot.
 Now you might ask why it’s worth doing it, after all if heavily over exposing is working, why is it a problem? The answer is that this is entirely optional. There are benefits when printing flat on the build plate because once you’ve removed the cause of elephants foot, you can do bases and other detailed prints with less issues. It will save some resin and may allow you to use shorter or no supports. The biggest benefit is that from what people have reported it effectively solves any adherence issues because you know the resin that is between the build plate and the print is fully cured and bonded together. But there is absolutely nothing wrong with doing this in a traditional way with a long exposure time and multiple base layers. Using your regular slicer you could easily run a hybrid solution with longer base layer exposure, but with wait time before curing for the base layers.
I’ll be honest, although all of this seems like it’s the perfect solution, it’s not. Having to use UVTools to modify your sliced file is yet another hassle and adds a second set of settings to have to learn and experiment with. Adding 15 minutes onto prints can be a real pain, especially for smaller prints. Now as time goes on, I’m sure slicers will incorporate this into their software natively, which will just make the whole process easier.
The engineer part of me though says that this isn’t something we should actually be needing to faff around with. Printers should have accuracy sensors built in that determines if the layer height is correct and pause the cure process until it’s within a set threshold. The solution developed for UVTools works, but isn’t that precise really, we basically guess that a specific number of seconds is enough for the build plate and fep to level out, we don’t actually know this for a fact. I think some printers are starting to incorporate controllers in their builds which does modify speeds and such like based on things like the weight and volume of the print, so I can see this coming – but we’re a significant distance from this being the normal.
And with that I shall bring this theoretical post to a close! Hopefully you’re a little more aware of the causes of elephants foot within 3d printing even if you don’t go down the road of using UVTools to fix it. Please let me know what you thought in the comments below