Deprecated: Using null as an array offset is deprecated, use an empty string instead in /home/pa-syco/public_html/runebrush/wp-includes/class-wp-block-type-registry.php on line 168
Deprecated: Using null as an array offset is deprecated, use an empty string instead in /home/pa-syco/public_html/runebrush/wp-includes/class-wp-block-type-registry.php on line 168
Deprecated: Using null as an array offset is deprecated, use an empty string instead in /home/pa-syco/public_html/runebrush/wp-includes/class-wp-block-type-registry.php on line 168
Deprecated: Using null as an array offset is deprecated, use an empty string instead in /home/pa-syco/public_html/runebrush/wp-includes/class-wp-block-type-registry.php on line 168
Deprecated: Using null as an array offset is deprecated, use an empty string instead in /home/pa-syco/public_html/runebrush/wp-includes/class-wp-block.php on line 257
Deprecated: Using null as an array offset is deprecated, use an empty string instead in /home/pa-syco/public_html/runebrush/wp-includes/class-wp-block-type-registry.php on line 168
Deprecated: Using null as an array offset is deprecated, use an empty string instead in /home/pa-syco/public_html/runebrush/wp-includes/class-wp-block-type-registry.php on line 168
Deprecated: Using null as an array offset is deprecated, use an empty string instead in /home/pa-syco/public_html/runebrush/wp-includes/class-wp-block-type-registry.php on line 168
Deprecated: Using null as an array offset is deprecated, use an empty string instead in /home/pa-syco/public_html/runebrush/wp-includes/class-wp-block-type-registry.php on line 168
Deprecated: Using null as an array offset is deprecated, use an empty string instead in /home/pa-syco/public_html/runebrush/wp-includes/class-wp-block-type-registry.php on line 168
After many years of stalwartly avoiding it, I’ve recently just taken the plunge and purchased a 3d printer, and thought it might be interesting to do a few articles on my experiences with it, dispel some myths and perhaps create the odd tutorial.
I suppose the first question to answer is why I’ve decided to do this and why now? I can’t lie and say that despite the appeal of being able to 3d print miniatures I’ve always been put off by the quality of what I’ve seen. Traditionally somebody would post up a photo of a slightly transparent model covered in layer lines and little resin support bobbles, often with less details than a plastic model from 20 years ago. There were higher quality printers that could solve this but you were talking about needing to spend thousands to get one and needed some real specialist knowledge.
 Earlier this year, I had a completely crazy idea for a Golden Demon entry, the key feature of this was six identical looking legs. After sinking £40 on eBay for a handful of bits, I realised I was looking at a massive money pit for my idea. I’m “OK” at kitbashing and scratch building, but creating 6 near identical legs was going to be a hard call. It was then that a friend suggested 3d sculpting the bits as it wouldn’t cost me anything other than a bit of time. Seeing this as a great excuse to do something I’ve wanted to do for years, I started teaching myself Blender with reasonable success.
It wasn’t ever my goal to pick up a 3d printer, my intention was to get my parts printed off by one of the many professional print companies out there, however two things happened. Firstly I realised I needed to get a draft printed to make sure that I’d got the scale right and secondly the company I contacted never got back to me (not even a “no we’re not interested”). After receiving a draft print from a friend, I realised that I not only needed to rework the entire piece but needed the facility to print out my own drafts as I went – it’s not fair to expect a friend to put time and money into my projects. So I sat down and had a look into printers to see if I could get something affordable to do draft prints – not going to lie, I was quite surprised by what I found.
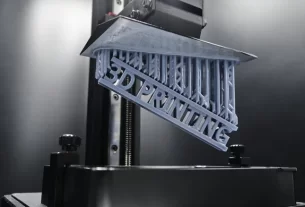
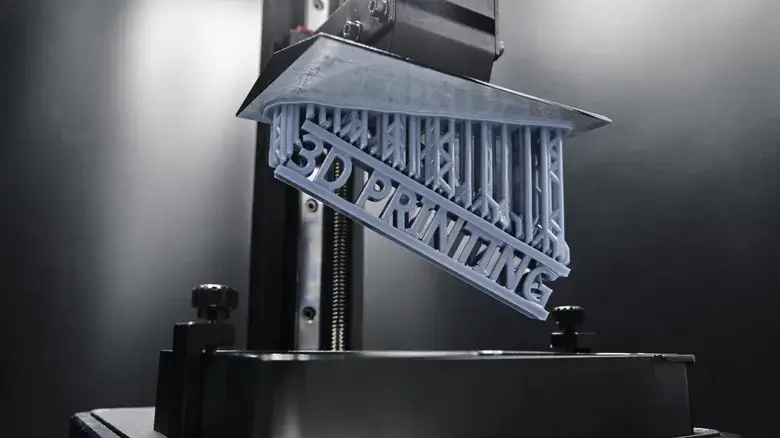
 The past few years have seen an unbelievable amounts of progress being made within this industry. Printer manufacturers have nailed the 35 micron (and smaller) pixel size on resin printer screens, chemists have started creating miniature specific resins that are easier to work with and can hold better detail, slicer software can do pretty decent auto-supporting of sculpts and content creators have made some amazing guides on how to get the best out of printers. Layer lines can still a thing – but they’re so fine you need a microscope to see them. Key though is that entry level printers can deliver amazing quality for a very reasonable price – I wasn’t looking at draft prints, I was looking at full production pieces…
After a huge amount of research and procrastination, I decided that I could justify getting a printer for my Golden Demon project and had enough ideas (especially since picking up Blender) to keep the printer going for a fair time and supplement my hobby in areas that I don’t enjoy as much (such as making bases for miniatures) or technically are difficult without a workshop of tools.
 With my course set I had to decide on a printer. It was very tempting to jump in with both feet and sink a thousand pounds into a printer, however realistically I didn’t even know if I would get on with the process, the entire experiment could prove to be a flop and that’s a lot of money to spend if that was the case. If you speak to anyone within the 3d printing community, you’ll be told that the Elegoo Mars series is a super solid entry level printer that nearly always delivers great results. I spotted that a new version of the Mars was coming out soon – the Mars 4 9k. Although it would mean that I would have to wait at least a couple of months until it was released, it gave me time to prepare the space for the printer and get everything ready (spreading the cost of it too). With a lower investment in the printer I could also upgrade at a later date without feeling I’ve wasted money – 3d printers seem to get a new iteration every year, so it will be an upgrade all round.
Myth Dispel 1: Why do GW charge £x, I can print if off for pence!
Not to put to finer point on it, I’ve comfortably sunk between £500 and £600 over three months into my set up. The printer and wash & cure station were around £350 (that includes a £40 discount), I’ve added a workbench into the garage along with a paper towel dispenser, slap mats, respirator to name but a few. Consumable wise you have the resin, cleaning alcohol, gloves, paper towel and electricity. Even at it’s most simple a box of 100 nitrile gloves is a fiver and you need between 2 and 4 gloves per batch of prints (at a minimum). Yes the resin cost is low, but the total investment is high – we’re talking 4 Indomitus box sets to before you can even print out a model and a lot of learning.
Don’t get me wrong, three months is a long time and temptation frequently flicked for me to pick up an earlier model of Mars or a Saturn with it’s larger build plate, but I held fast and in the middle of September received my shiny new printer!
And that neatly brings my story up to the current time. I’m now in the middle of “dialling in” my printer and working out the exposure settings – being a brand new printer there isn’t a lot of community information out there and I chose to go for a non-standard resin too which complicated this – however I’d done a huge amount of research into what was needed, so felt I was very prepared.
Myth Dispel 2: 3d printer goes brrrr! (I hate this saying)
Without beating around the bush, 3d printing is messy, wasteful, smelly and hazardous. As soon as you take the build plate off the printer, resin will be trying to dribble everywhere, no matter how careful you are you’ll get it over your gloves, the printer, the vat etc. You’ll use mountains of paper towel to wipe things down and get through loads of nitrile gloves. Even the low odour resins can stink and catch in the back of your throat if you’re not ventilating or wearing a respirator. Resin is also hazardous – the fumes can cause issues and getting uncured resin on your skin can cause irritation and other problems.
In short, it’s not as simple as plugging in a USB stick and pressing print. Don’t get me wrong, it is exceptionally rewarding, but you have to treat the whole process with a certain amount of respect.
Although it’s exceptionally early on in my 3d printing life, there are a few things that I’ve picked up already.
Tip 1: A clean space is a safe space.
Because of how messy things can get, it’s really important to make sure you’ve a clear work surface. Don’t work in a mess and put things away as you finish with them. It will help to avoid spills and mean you’re less likely to damage something or have an accident.
Tip 2: Everything should have a home
Set up your space so that everything is coordinated together based on what you do where. For example, directly above where I remove models from the build plate I’ve a hook with my scrapers. The paper towel dispenser is set to the right for ease of access (the right as I’m right handed).
Tip 3: Start creating a workflow
A bit like riding a bike or driving a car, you need to make the process of 3d printing become second nature. This will mean you work efficiently and minimise silly mistakes. This is done by creating what is generally referred to as a workflow and in simple terms if you doing everything in a set sequence rather than differently each time. A good example in my workflow is after removing my models from the build plate, I wipe the plate down, put it back on the printer and tighten the fixing screw (guess who forgot to tighten the screw once).
And that dear reader is the end of my first instalment. I’ve already learned a huge amount before I even got my printer and there’s a huge amount left to learn as I start printing things off. If there’s any specific questions you have or requests for future instalments, guides or tutorials, please let me know in the comments.