Deprecated: Using null as an array offset is deprecated, use an empty string instead in /home/pa-syco/public_html/runebrush/wp-includes/class-wp-block-type-registry.php on line 168
Deprecated: Using null as an array offset is deprecated, use an empty string instead in /home/pa-syco/public_html/runebrush/wp-includes/class-wp-block-type-registry.php on line 168
Deprecated: Using null as an array offset is deprecated, use an empty string instead in /home/pa-syco/public_html/runebrush/wp-includes/class-wp-block-type-registry.php on line 168
Deprecated: Using null as an array offset is deprecated, use an empty string instead in /home/pa-syco/public_html/runebrush/wp-includes/class-wp-block-type-registry.php on line 168
Deprecated: Using null as an array offset is deprecated, use an empty string instead in /home/pa-syco/public_html/runebrush/wp-includes/class-wp-block.php on line 257
Deprecated: Using null as an array offset is deprecated, use an empty string instead in /home/pa-syco/public_html/runebrush/wp-includes/class-wp-block-type-registry.php on line 168
Deprecated: Using null as an array offset is deprecated, use an empty string instead in /home/pa-syco/public_html/runebrush/wp-includes/class-wp-block-type-registry.php on line 168
Deprecated: Using null as an array offset is deprecated, use an empty string instead in /home/pa-syco/public_html/runebrush/wp-includes/class-wp-block-type-registry.php on line 168
Deprecated: Using null as an array offset is deprecated, use an empty string instead in /home/pa-syco/public_html/runebrush/wp-includes/class-wp-block-type-registry.php on line 168
Deprecated: Using null as an array offset is deprecated, use an empty string instead in /home/pa-syco/public_html/runebrush/wp-includes/class-wp-block-type-registry.php on line 168
 Despite working on my Orruk Megaboss for almost a month, I’ve not put up a decent Work in Progress blog post, so get yourself comfortable I’m going for a Waaagh!
If you don’t follow me on Twitter you’ll likely be surprised at the sudden change from Bloodbound and Ad Mech (and painting Red). As I think I said in my BLACKOUT 2017 review, I had an urge to paint up an Orruk of some kind with the potential to paint up an army. I’ve wanted to paint up an Orruk Megaboss since I saw it in White Dwarf, but was always put off by the price – £25 is really quite steep for a single miniature and even with a bit of discount from a third party you’re not far off a unit of ten models.
But with inspiration from the tournament (and heckling from friends) I ordered myself the Megaboss at the beginning of September…
Orruk Megaboss Clam Pack
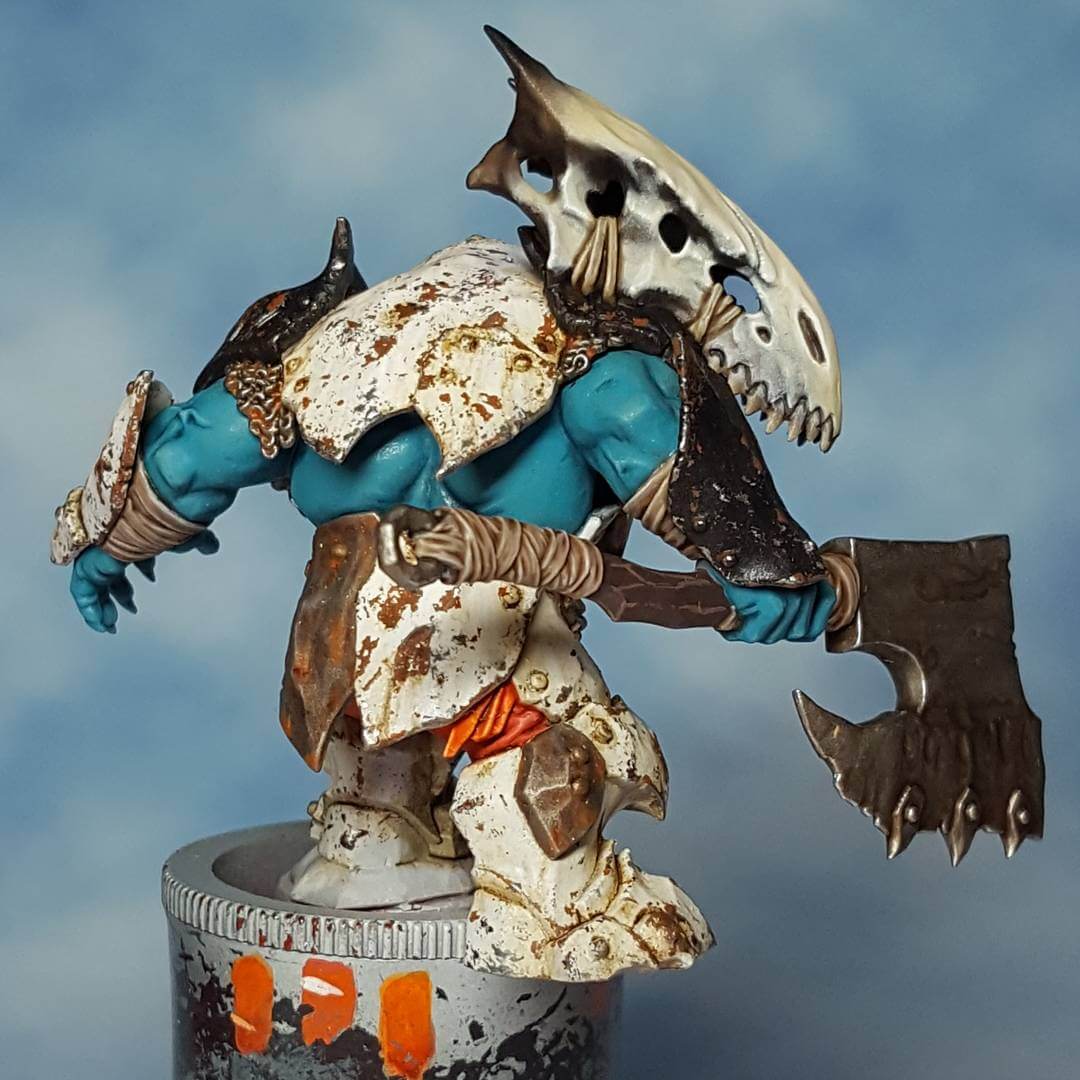
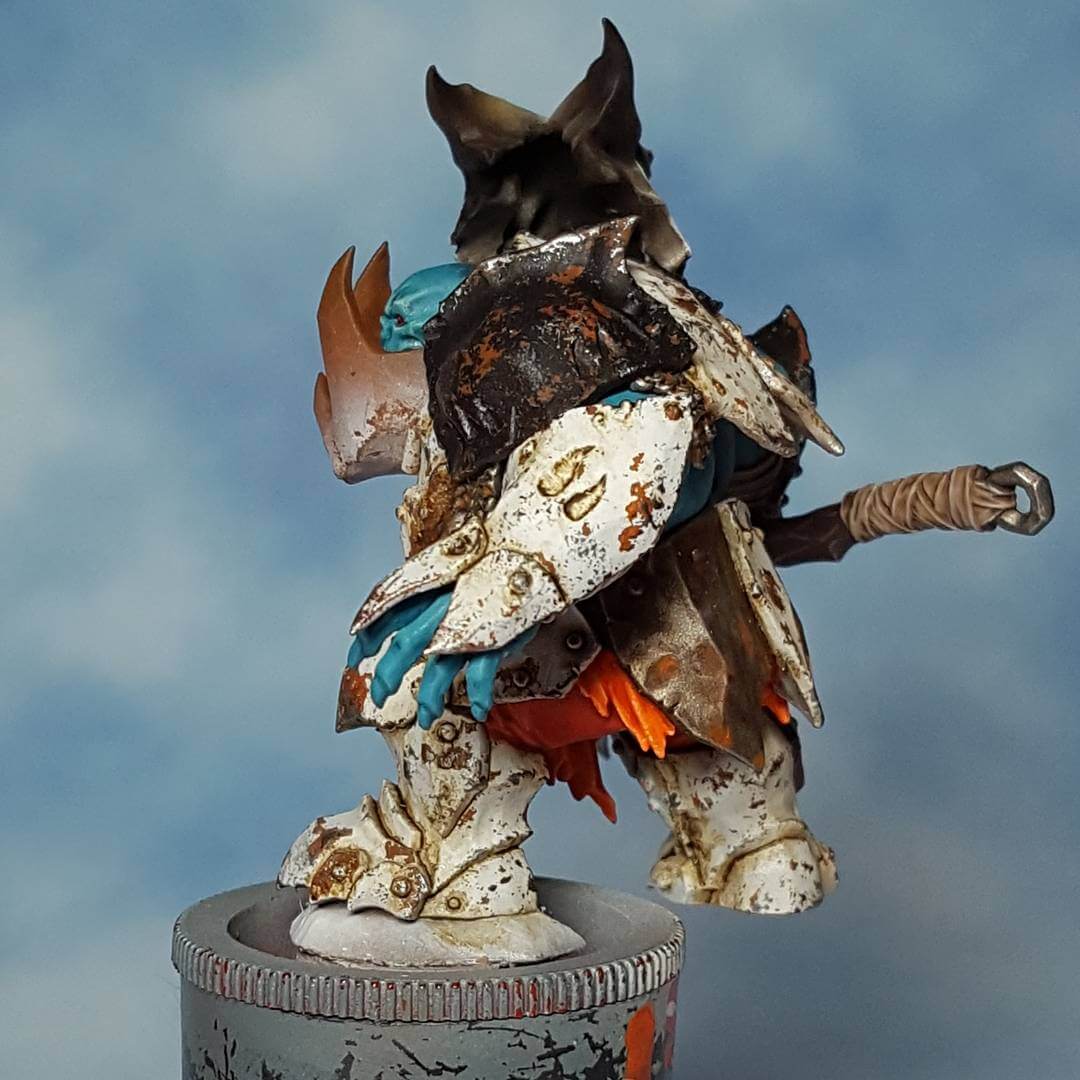
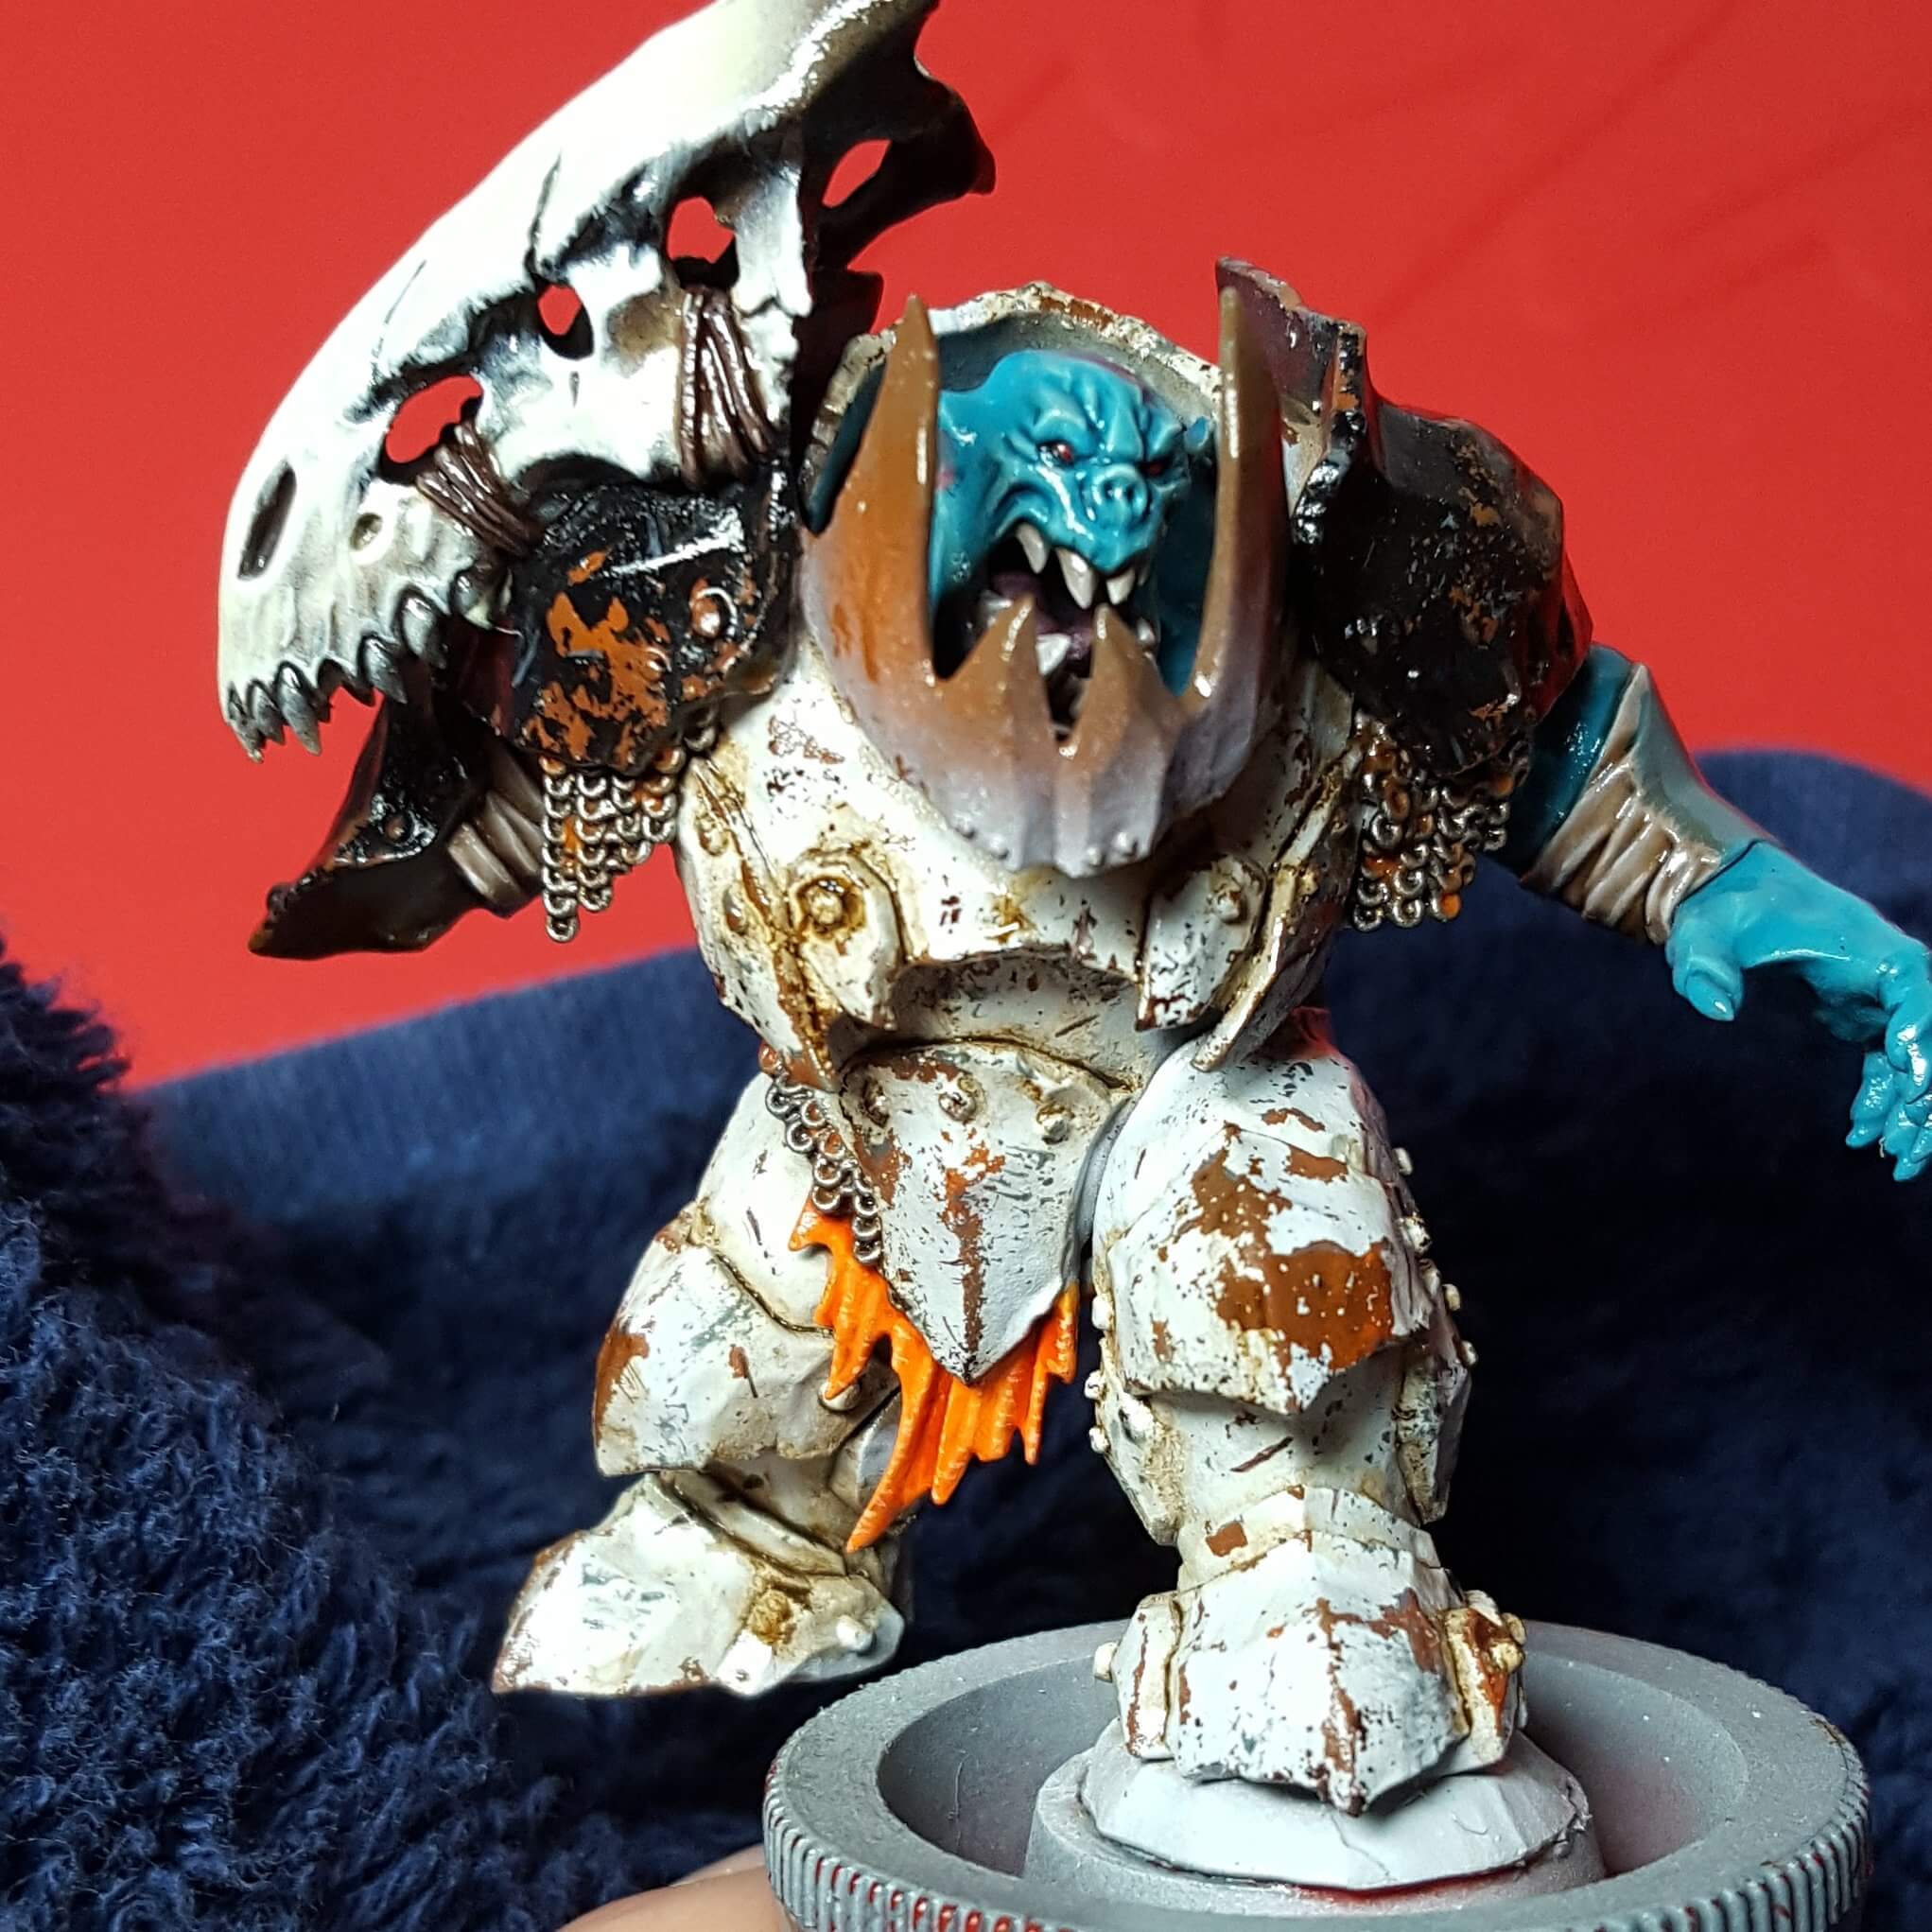
Upon receiving and opening the clam pack the first thing that strikes you is the size. Photos just don’t do justice to what a monster this model actually is. To try and put it into perspective, the base that he comes with is a 60mm “dreadnought” sized base and he doesn’t look out of place on it. If you stand him next to a regular human sized model he is a massive looming hunk of armoured flesh.
The model is an absolute joy to assemble and paint with two exceptions. The first is that shoulders and front/back chest armour come as two separate pieces. This is great in that they can be left off to gain access to the shoulders, arms and face of the Orruk Megaboss but, the issue is that the shoulders (and skull on one shoulder) have a join right down the middle. This means that you really need to glue and fill these in after you’ve painted the face and other parts of the model, which resulted in me spending quite a few hours masking parts of the model off so that I could undercoat those items with a spray can. The end result is worth it, but I do wonder if more parts could have made this easier. Mold lines down the skull would look awful if you left them.
The second is that the pose is pretty fixed, if you wanted a second Megaboss you’d be limited to different shoulders, weapon and head unless you did some pretty extensive conversion – the pose is also very similar to the Megaboss on Maw Krusha.
Orruk Megaboss Painting
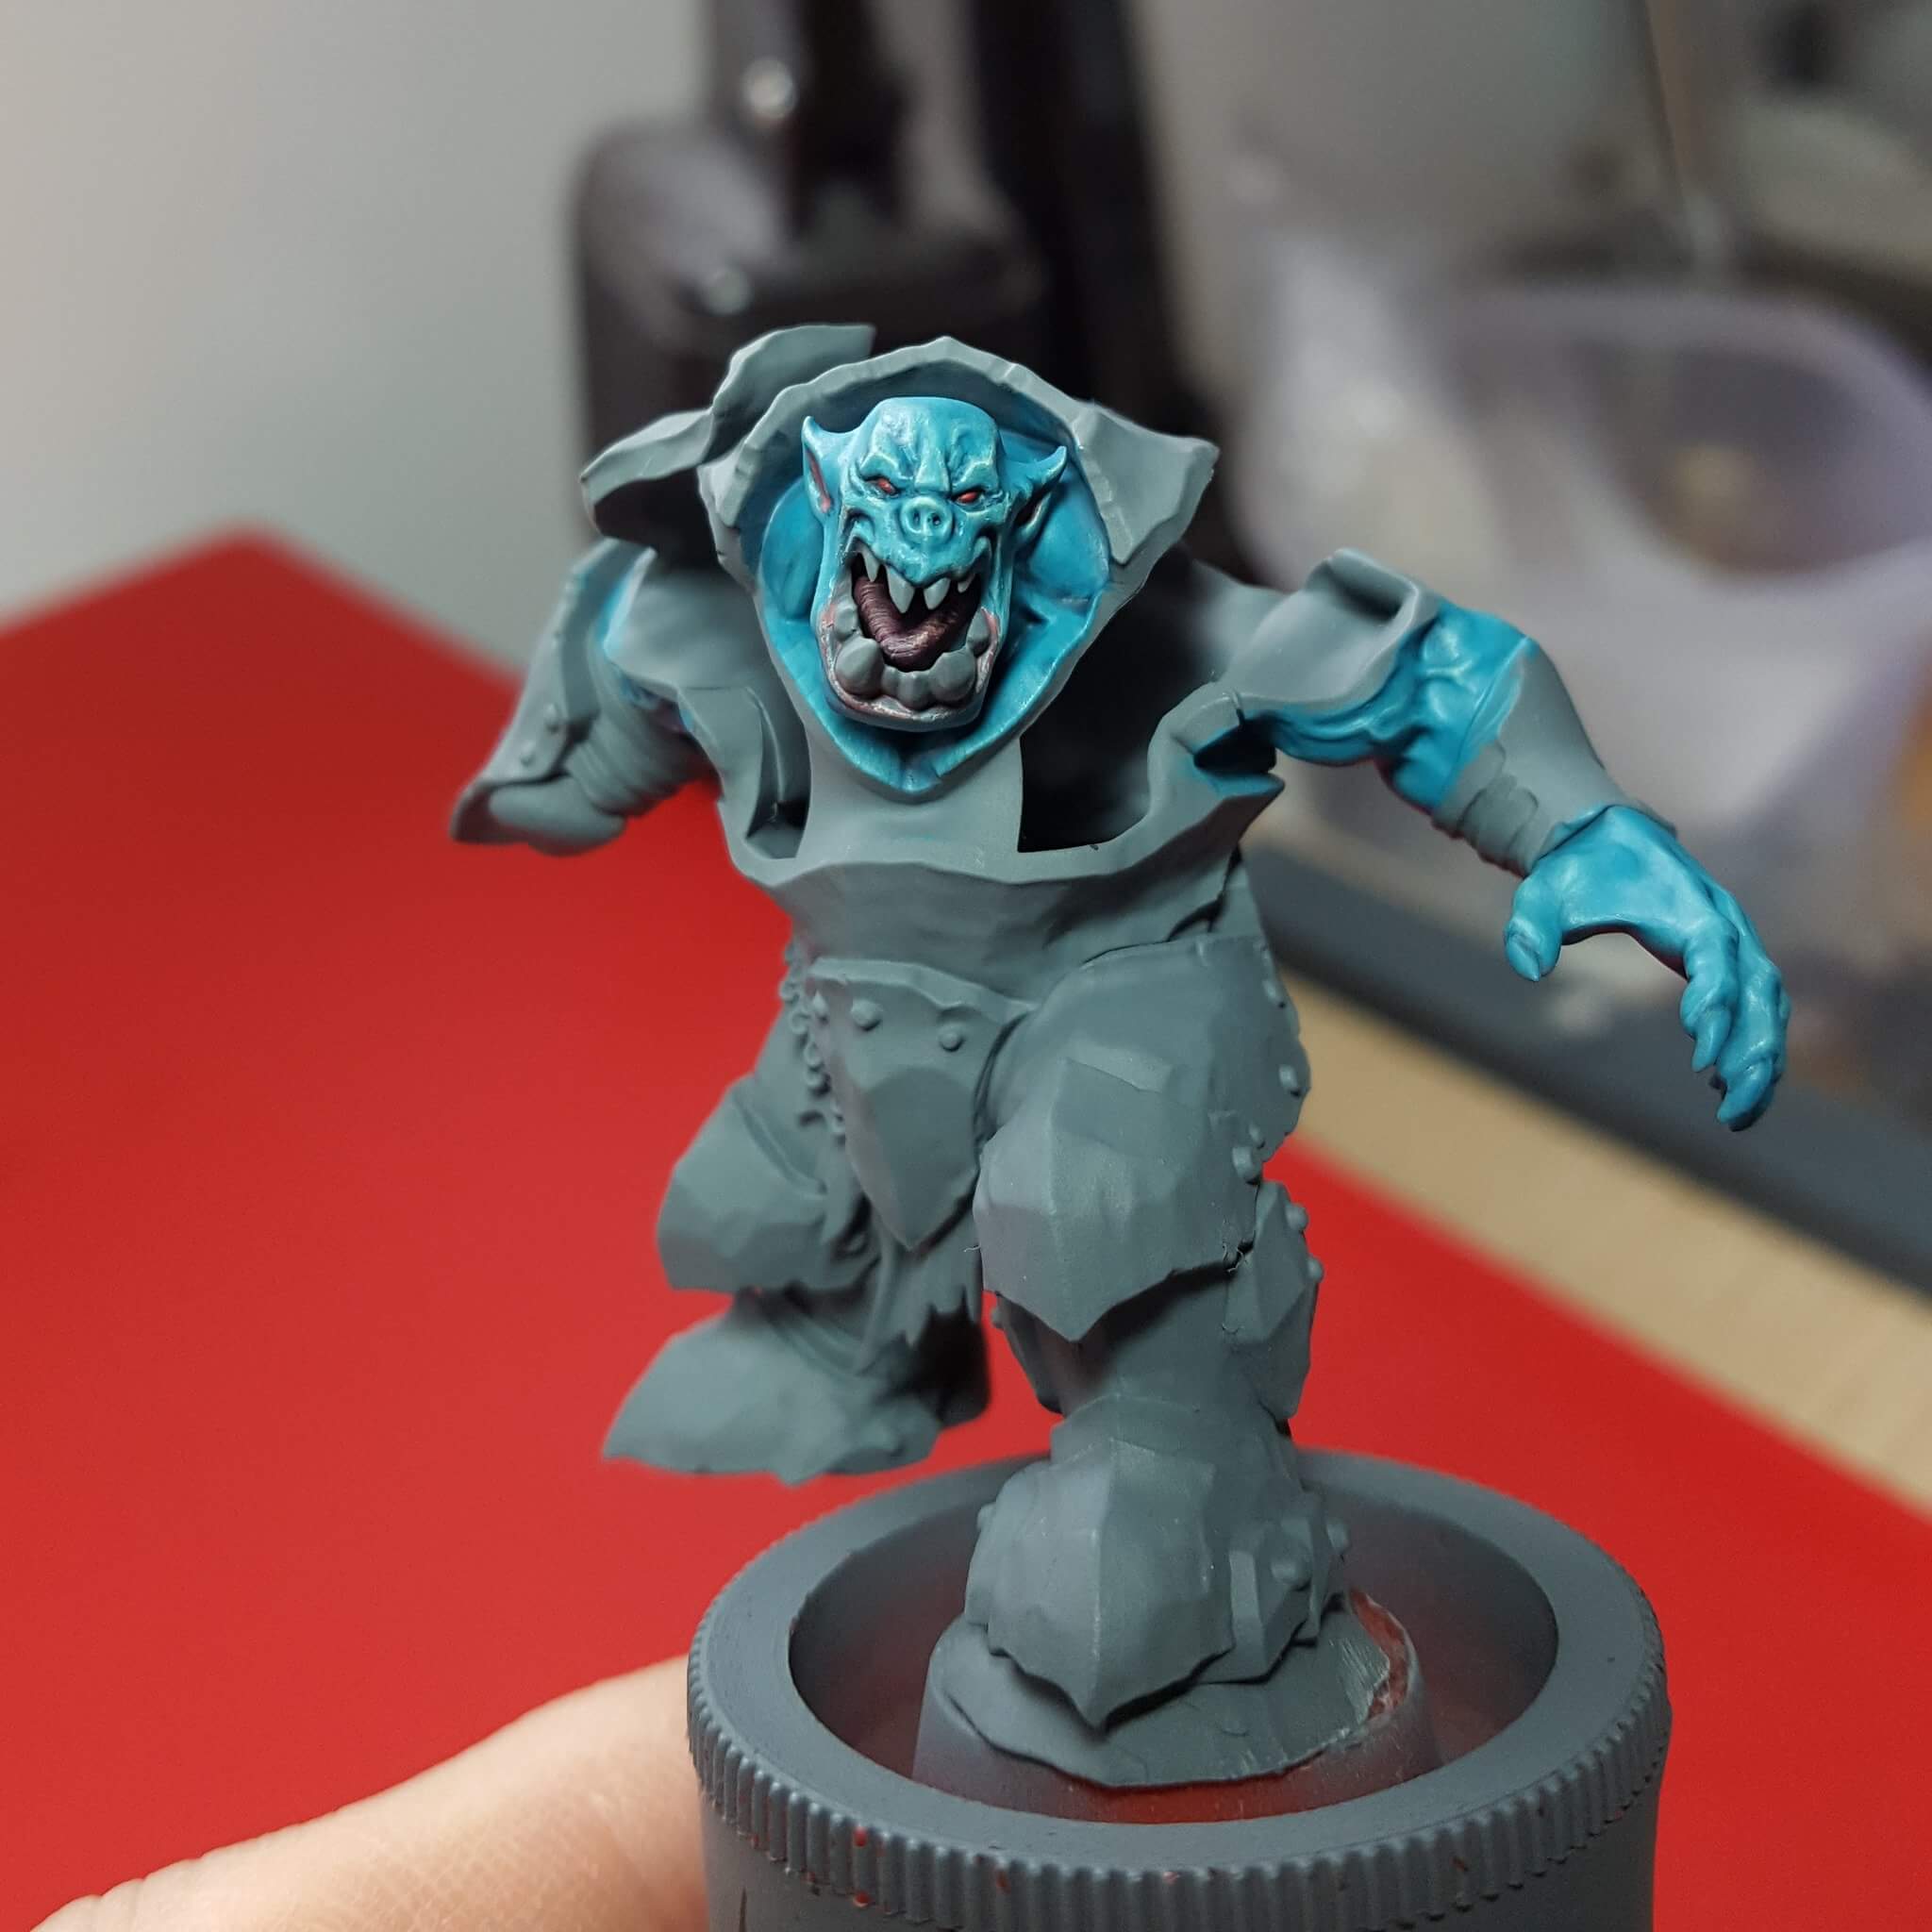
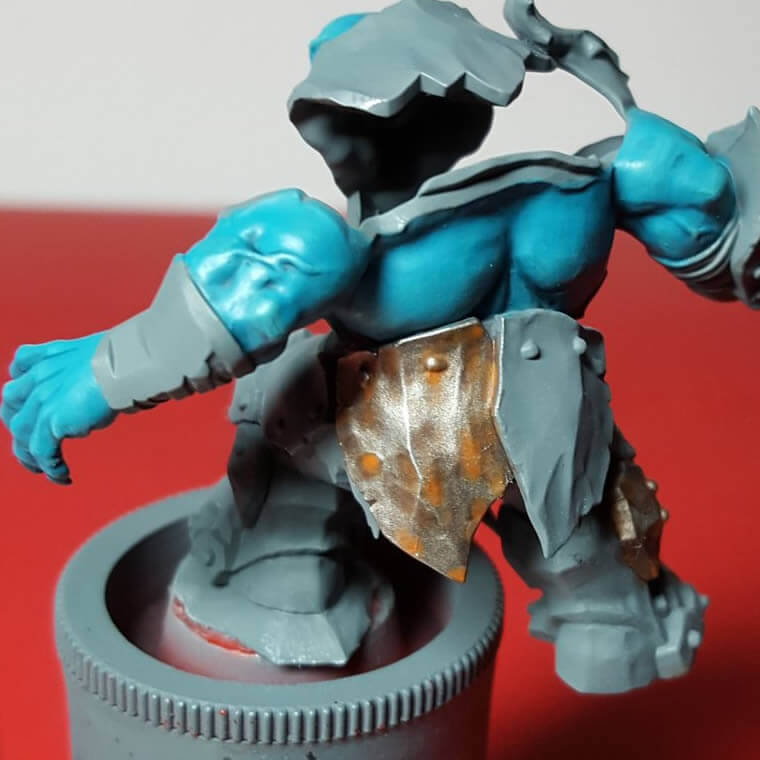
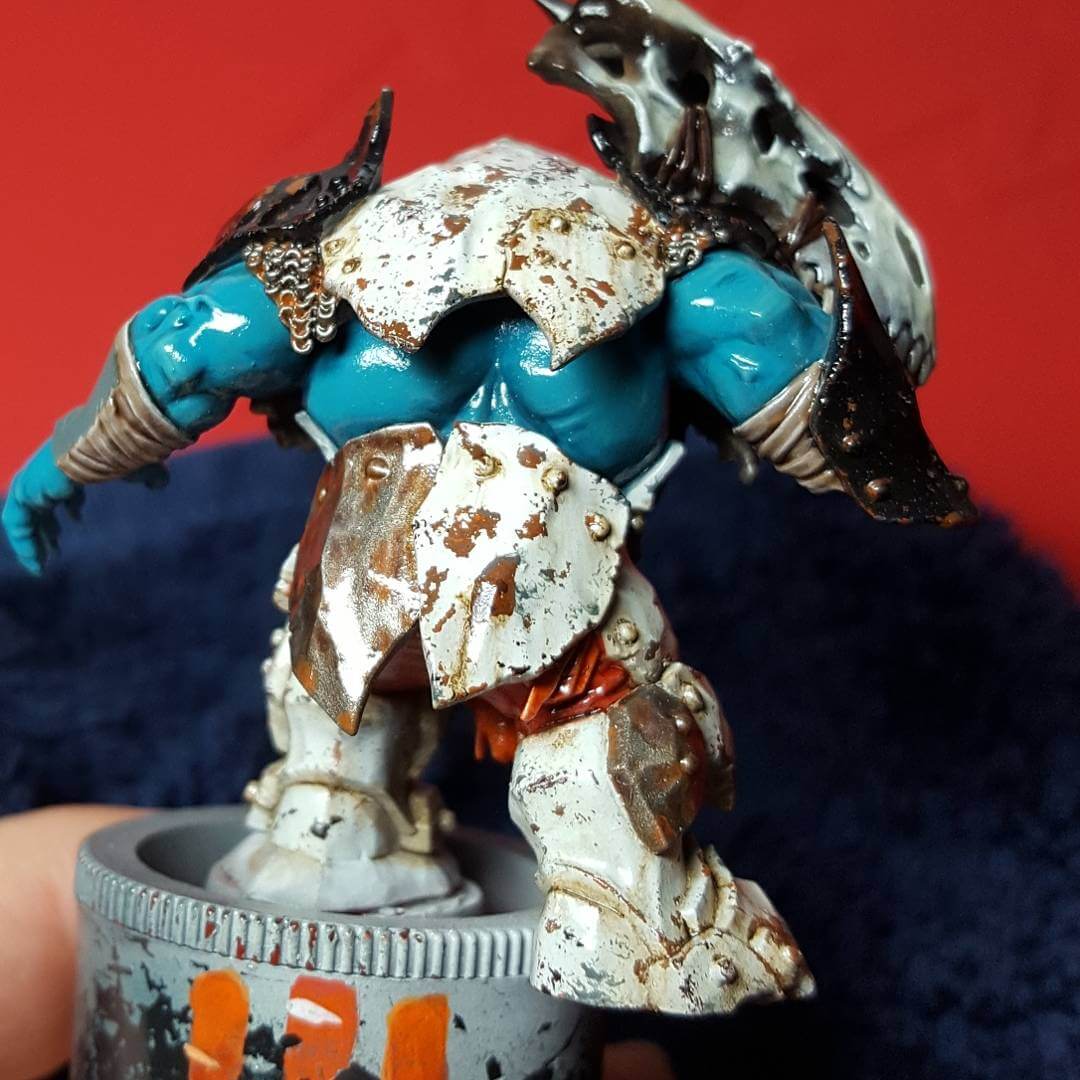
I deliberated on what colours to paint this model for many hours. I really enjoy painting green skin and there are now a massive range of earthy natural greens that part of me wanted to paint this model very traditionally. However I knew that this wouldn’t really make the army stand out on the tabletop, plus I’ve followed traditional Games Workshop colours for my Bloodbound. Painting master Darren Latham did a tutorial for a turquoise blue flesh colour a while back, which I’d come across a few times, it was very different but equally much more time consuming than most techniques and would need converting to the new paint range. So in a burst of madness I decided to paint my Megaboss with a pale turquoise flesh…
Now my end result is much darker than Darren’s came out – I put this down to him being a superior painter to me 😀 As a very quick aside, I used a grey undercoat for this model, specifically Mechanicus Standard Grey straight from the can (i.e. no Chaos Black undercoat). I’m really impressed with this and can see this becoming a very regularly used base colour – the worst thing about it, is that it’s almost identical in colour to Citadel grey plastic making it hard to see if you’ve covered everything.
The Armour
Warning – long section!
Armour wise, for once I actually went to a colour wheel to work out what complimentary colours would work alongside the turquoise flesh – pink and orange. Now I don’t have an issue with pink, but not sure I really wanted to become known as “that” person so plumped for orange… What a mistake! I must have wasted hours trying to come up with a nice orange scheme that looked right, even going so far as to mix up my own from reds and yellow. To cut a (very) long story short, I think Orange is one of the most difficult colours to paint anything beyond a “base -> fuegan orange -> highlight” method, easily surpassing yellow in it’s awkwardness. So I went back to the drawing board.
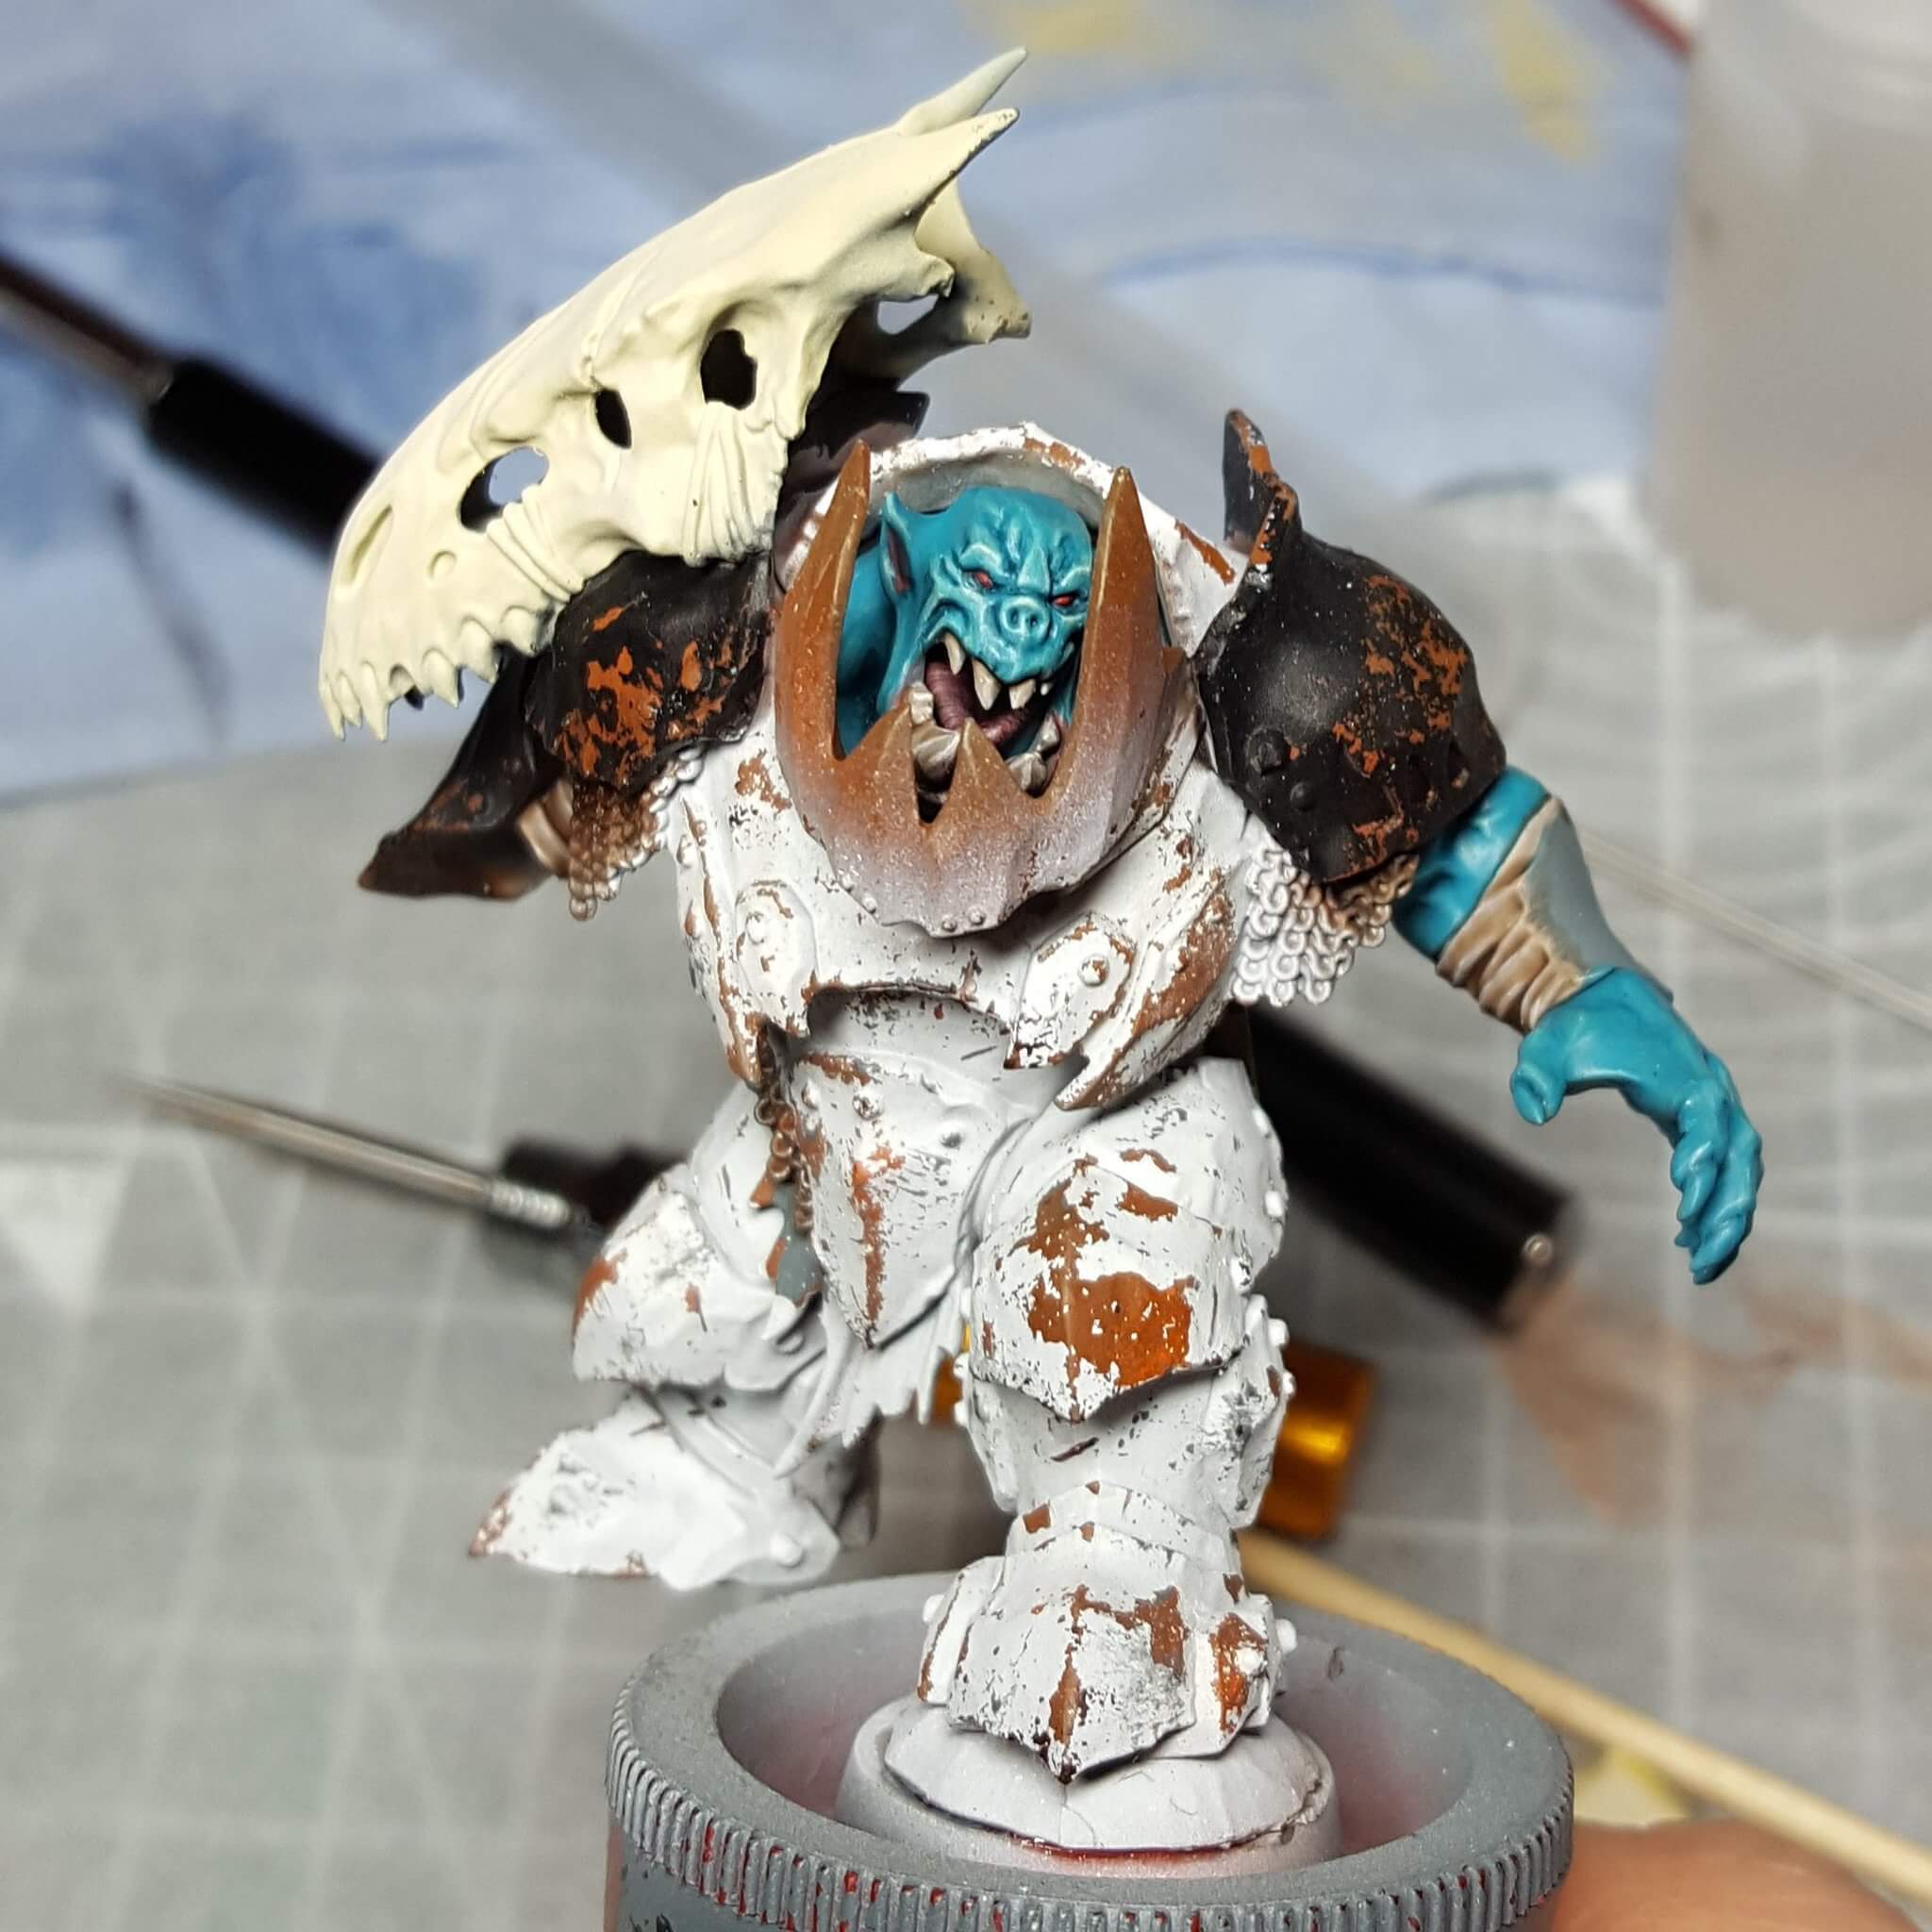
The choice I ended up going with was a really battered white, originally I was going to stipple on various colour to represent chipping, but with such a large area decided to give chipping medium a go – might as well experiment on everything!
So after much very careful masking the process went as follows. Airbrush on a layer of Mournfang Brown, I put down a fairly solid layer of this. Next up airbrush on Skrag Brown, but try and be a little random with it, what you’re trying to achieve is patches of lighter brown. And for the third and final just a bit of Troll Slayer Orange, as with Skrag Brown you want it a little random. This paint is quite thin too, so you may want three or four passes for a solid colour – use this to your advantage and maybe only do that in a few places. The end result you want is a rusty brown layer. I would also suggest stippling on some Ryza Rust at this stage.
Next you want to apply a layer of chipping medium. I used Vallejo Chipping Medium in a dropper bottle which looks very much like watered down PVA glue and used an airbrush this needs at least ten minutes so to go off. Once dry put down a layer of Ulthuan Grey, this is a really nice off-white colour that has amazing coverage (and comes in an airbrush paint), go over all the armour with this and then follow it with a layer of white, I used Vallejo Model Air white, but White Scar Air is just as good in this case (I was being lazy and one was downstairs).
You should now have the armour a lovely pristine white finish with absolutely no depth in the recesses or highlights to the tips. Quite simply it’ll look awful, but now comes the fun part. Give the paint an hour or so to dry, then get a toothbrush and little pot of water. Put some water onto the paint and then a few seconds gently scrub the white. What should happen is you’ll carefully remove some of the white layers and reveal the rusty brown layer 🙂 You can use a cocktail stick to make individual scrapes too.
I then left the model overnight to properly dry and cure before going in with a sponge and some Standard Mechanicus Grey to add a few light chips. With hindsight, this should have been done before the chipping as you have to be really careful to not destroy the chips you’ve made. You can also use a fine brush and shade the larger chips – you can use a dark brown or mid-grey depending upon the rusty layer.
The whole model then gets a coat of Gloss Varnish from a can (I can recommend Liquitex). Although you could gloss from an airbrush I think a can lacquer is much harder wearing and less likely to breakdown for the next step. Leave this to cure for at least 24 hours (read the can – it may be longer) as you want a really solid base. You now get a chance to be artistic and play with oil washes! I used AK Interactive Streaking Grime, however you can easily make your own up from a mix of Umber, Black and little bit of Sepia, thinned down into a wash with White Spirit. Basically apply this wash into all of the recesses, round the rivets and any armour panels. You can dot some into the bottom of the chips too. Give the oil ten minutes or so to solidify and then use a clean brush but damped down with white spirit to move the oil paint round into streaks, soften edges and such like. You can safely add in more oil paint wash and repeat the process, the oil will remain workable for a day or so you can take your time and keep coming back to it if you want.
Now the most important (and frustraiting) thing is that you need to leave the oil roughly 72 hours to fully cure once you’ve finished messing with it. Once done I airbrush the whole model with Daler Rowney Soluable Matt Varnish, which you thin with white spirits (make sure you stir it) – if you don’t let the oil cure you can mess it up when doing this! You can use Testors Dullcote instead if you’re not a fan of airbrushing varnish, but I’ve been stung too many times with matt varnish in a can so just go for the reliable airbush version – plus Dullcote isn’t cheap and not that regularly available in the UK.
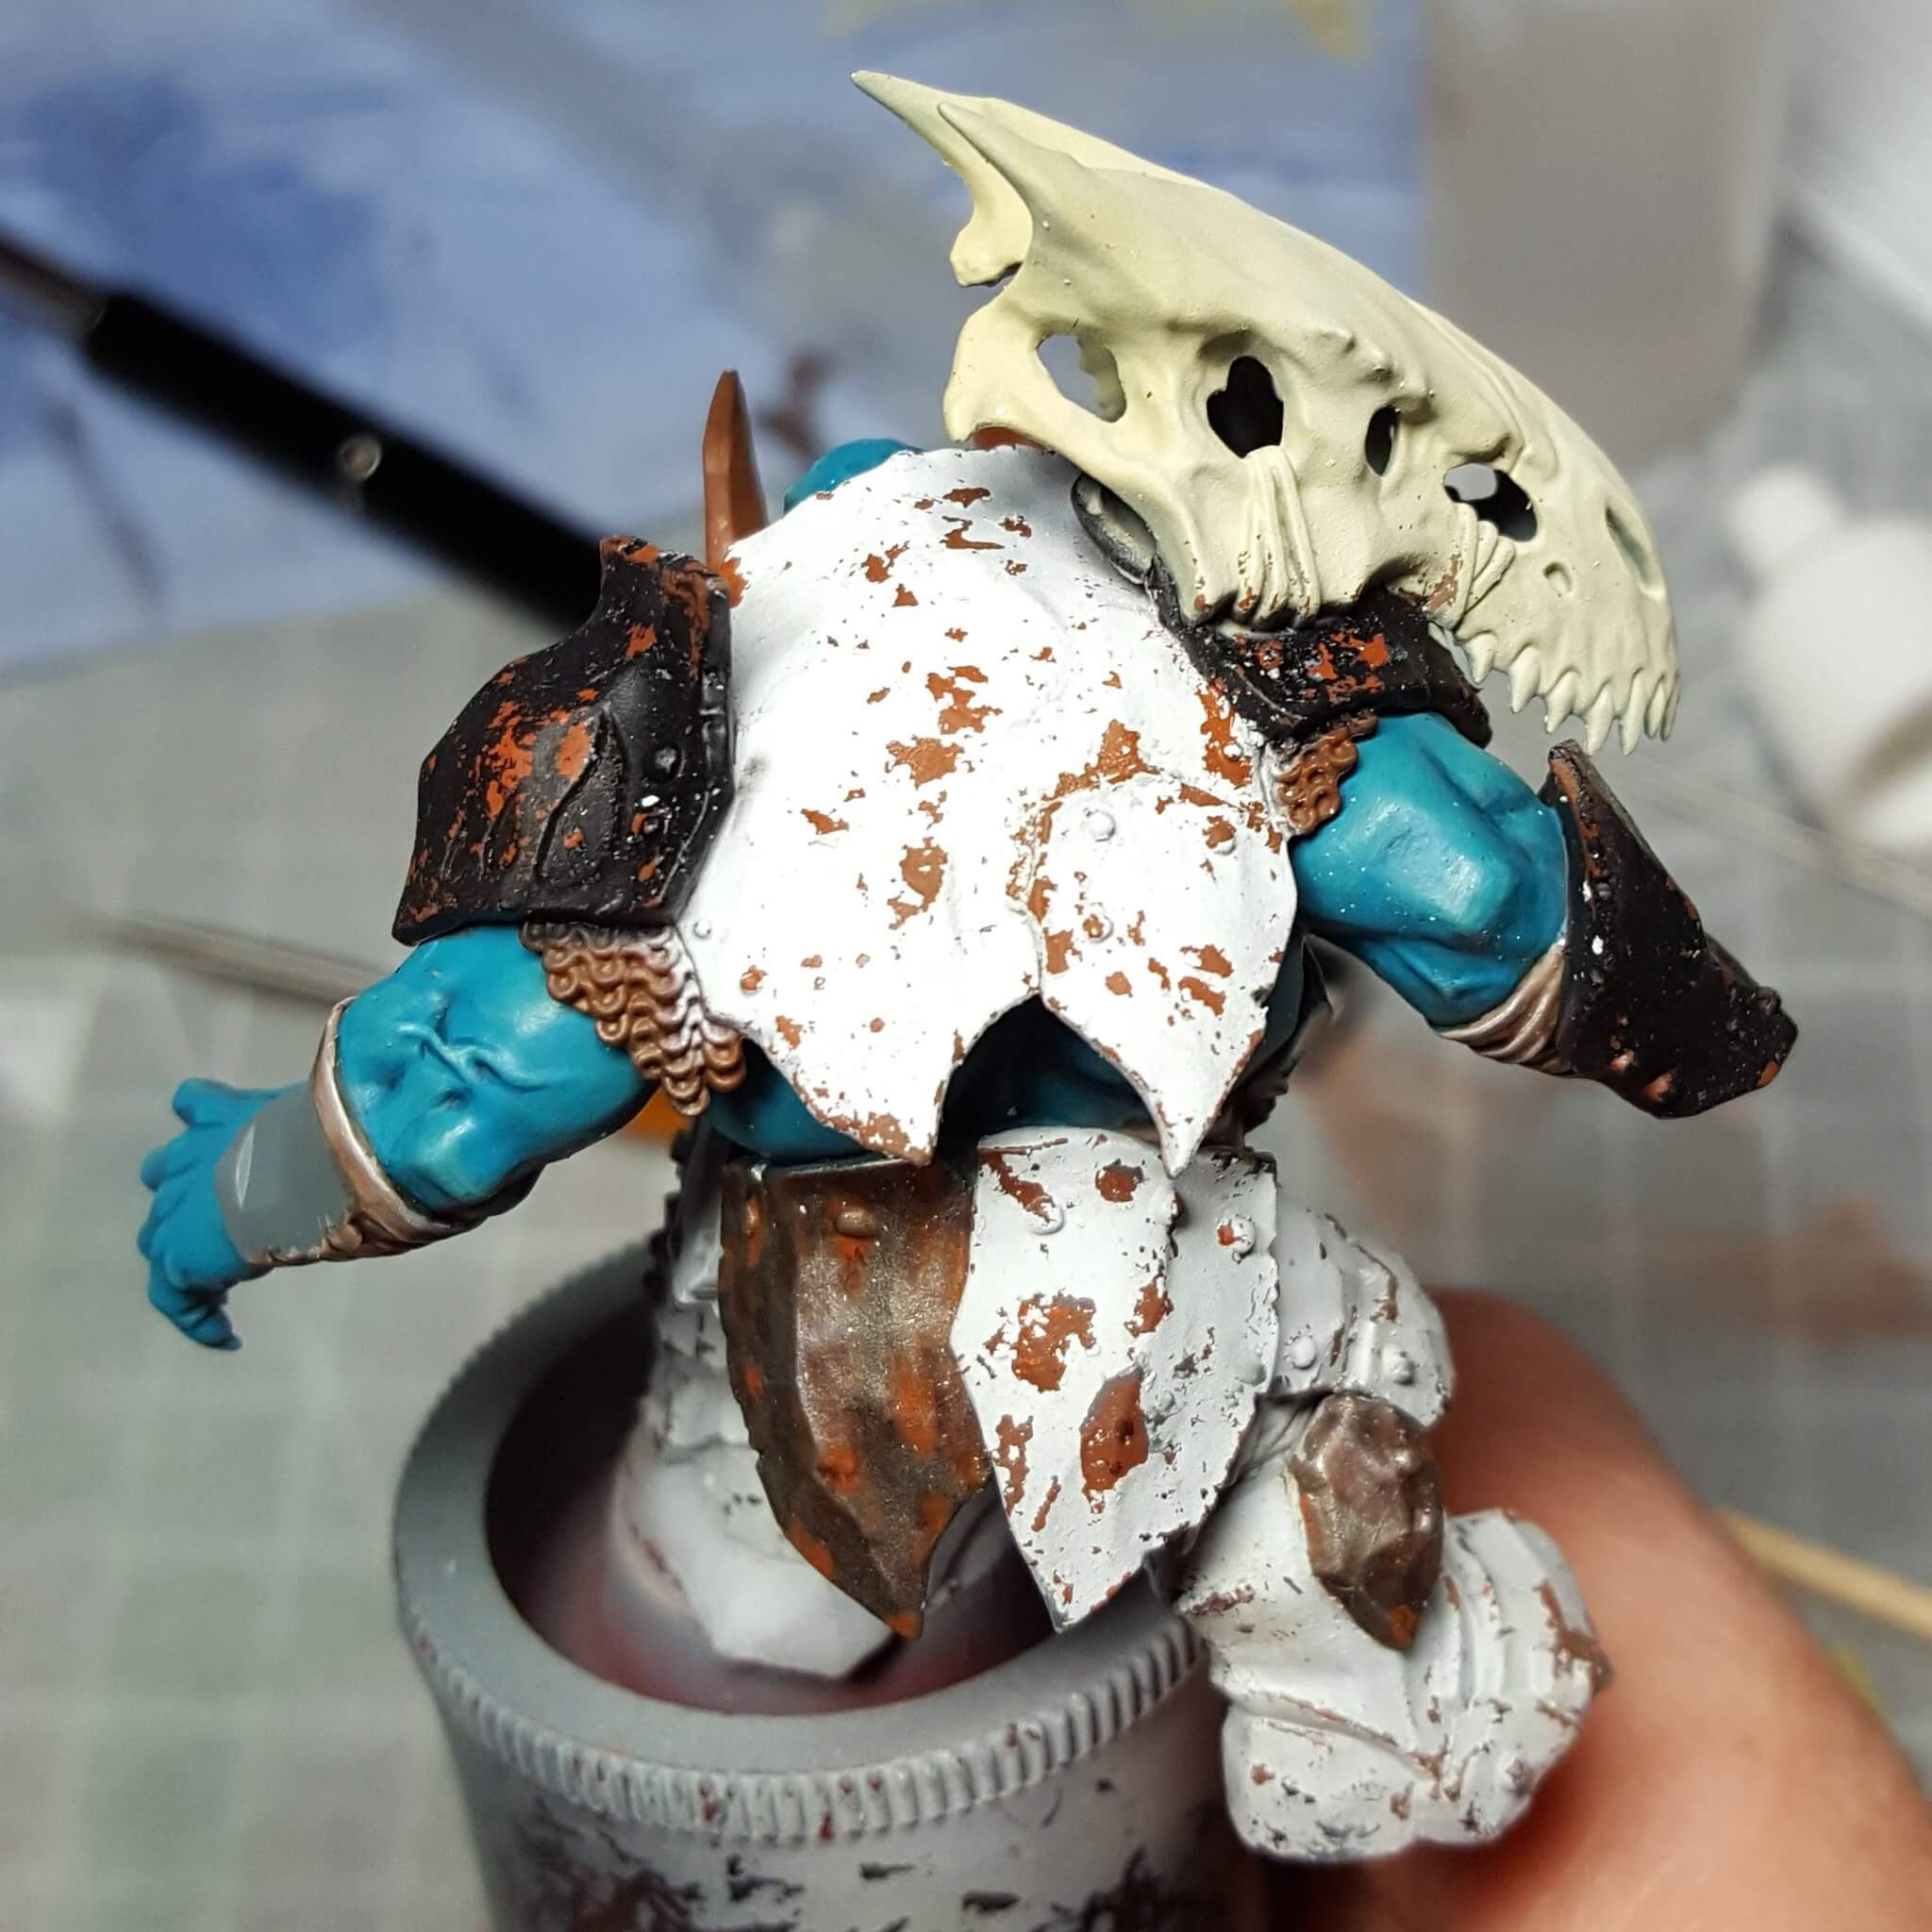
We’re not quite finished with the armour yet! The final steps are actually really quick, firstly sponge on some steel metallic colours, focus on the areas you’ve exposed rust and the edges of the armour. The reason for doing this now rather than with the other chipping is that the matt varnish will remove the shininess of the metallic which is really crucial for those eye catching scratches. Because the Orruk Megaboss is such a large model I used Leadbelcher and Vallejo Metal Colour Silver for variety, on a smaller model I’d likely stick with just one. Then as the final item I used a fine brush and applied Rhinox Hide as a few chips and to shade some of the silver areas which provides a bit of a visual distinction where the silver overlaps the white. There isn’t a hard and fast rule – if it looks like it needs it, it probably does!
(Pic below of how this looks)
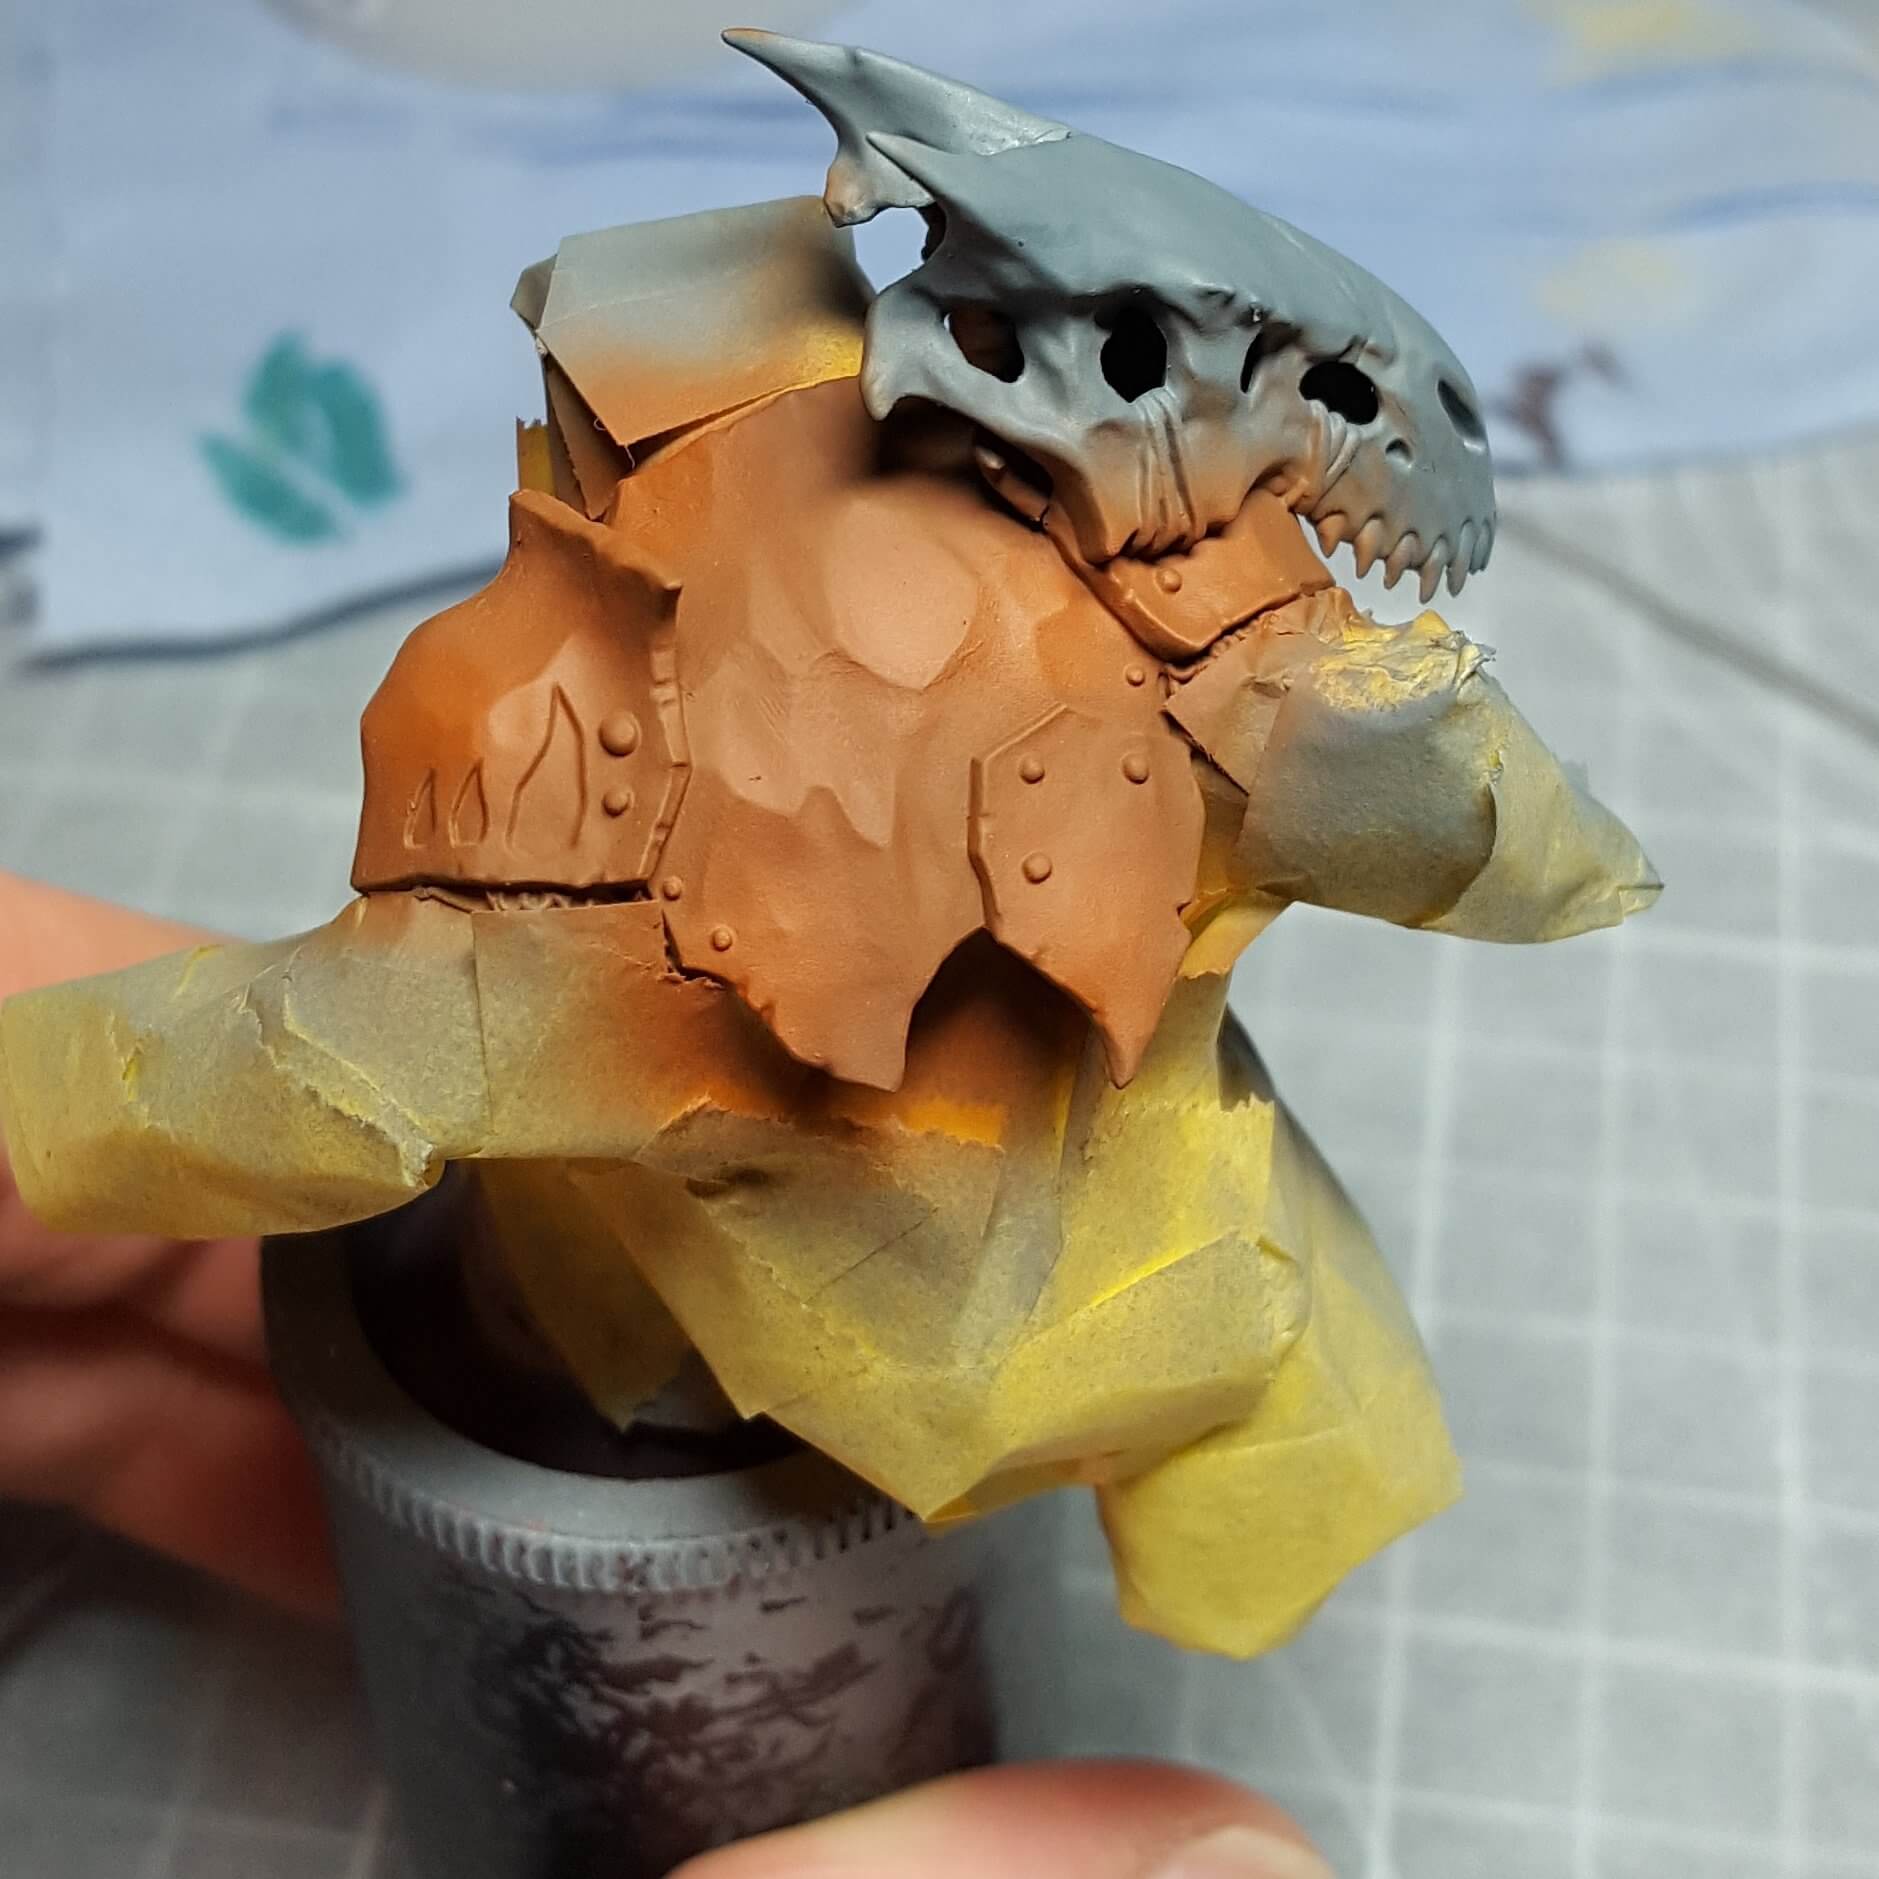
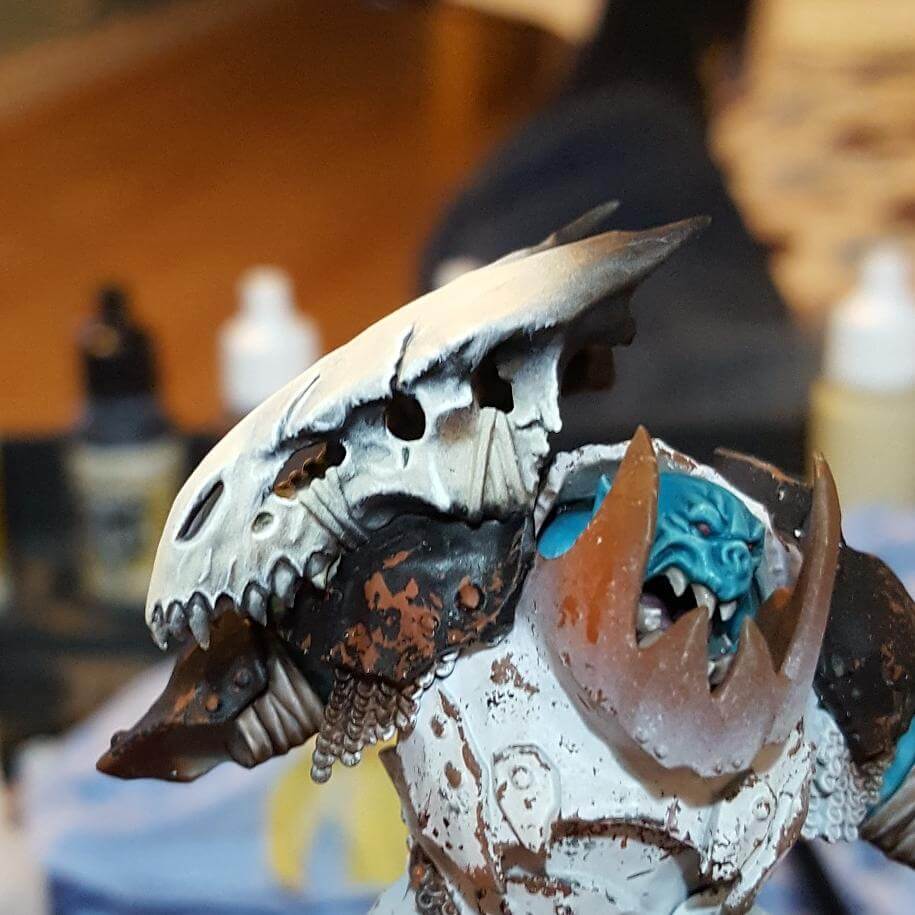
Beastie Skull
One of the most dominating parts of this model is the huge beast skull he’s wearing on one shoulder. This really is the feature of the model and as such needed a bit more attention than the usual Zandri Dust -> Wash technique. What I ended up doing was going back to an old recipe I used to use with P3 Menoth White Base, shaded with P3 Battlefield Brown and black and then highlighted up with P3 Menoth White Highlight. The base colour, shading and highlighting were all done with my airbrush, but I then went in and carefully built up the highlights and some shadows with a brush, I also used Pallid Wych Flesh as an edge highlight to just make it pop a bit more. The horns got a glaze of Nuln Oil before I highlighted the top of the skull which helped blend in the different colours. Although I wouldn’t do this for a regular skull, for something as big as this, I think the extra time is really worth it.
Little Details
For a change this model doesn’t have too many detailed embellishments. His trousers got a layer of Squig Orange, Fuegan wash and then highlights and the little scraps were Jokaero, Fuegan and then Lugganeth.
The chainmaille was really simple with a Leadbelcher base, thinned Agrax wash followed by Skraag Brown wash and Troll Slayer Orange wash. Those two were carefully applied in tiny patches which emulates rust – rust on chainmaille “grows” from a few points that have got wet. A little bit of silver edge highlighting in patches completes the knackered effect.
Arm and weapon wraps are equally simple, with a Rakarth Flesh base colour, two thinned Agrax washes and then edge highlights of Rakarth followed by Pallid Wych Flesh. This has rapidly become a mainstaple in how I paint this type of detail. You can swap Rakarth out for Karak Stone (as I did on the bindings holding the skull on), this just adds in a bit of variety.
Almost Finished
So in roughly a month my Orruk Megaboss Gnasha is almost complete! I’ve got a few more details left to do – the claws and teeth on the skull need doing along with the necklace (which true to form I almost forgot). I need to decide on if I paint the skulls on the necklace the same as the Beast skull or more traditionally. His jaw needs to be painted something distinctive, as with the beast skull it’s such a feature of the model that painting it the same as his armour would seem a waste. The final step will be to paint various dagz and other details. I’m not going to go overboard with it, but he does need something. Actually I lie, the final step will be Blood for the Blood God 😉
The base is in hand and going to be Shyish themed I think – load of skulls and bones on a base with the crackled texture paint.