
Well it’s not quite a Sunday post, but it’s a post within a week and quite a long one at that 🙂 Firstly an up to date progress shot of my three Imperial Knights. As you can see (or not, the winter weather doesn’t make it easy to take a photo with a phone camera), the majority of the metallics have been done. I’ve still a few odd fiddly bits and bobs to do, such as pipes and smaller details which I hope to work on over the next week or so. Most importantly I’ve sorted out the resin weapons for the Maegera which I’ve been putting off for a while. The power gauntlet isn’t finished (as you can see it’s not even undercoated) and I’ve also a Thermal Cannon that I need to finish off now that I’ve bought a spare elbow joint. All of the weapon arms are magnetised primarily for storage but also so that I can use my Maegera as a normal Knight if I want. I’ve also a couple of carapace weapons.
One thing I’m really chuffed with is how well the blue glowing elements have turned out – the Plasma-fussil and Ionic Flare Shields really do pop in the mass of grey-metal and I’m currently considering if I should add some more blue glowing bits in vents and such like to break up the monotony of steel.
As I mentioned in my summary last week, since I’ve been doing these, I’ve purchased some Vallejo Metal Color paints. These new paints have allowed me to add some more techniques into my repertoire of painting metallics. In the above picture the heads have all been painted using the new paints with minimal washes and they do pop more than the dulled down chassis.
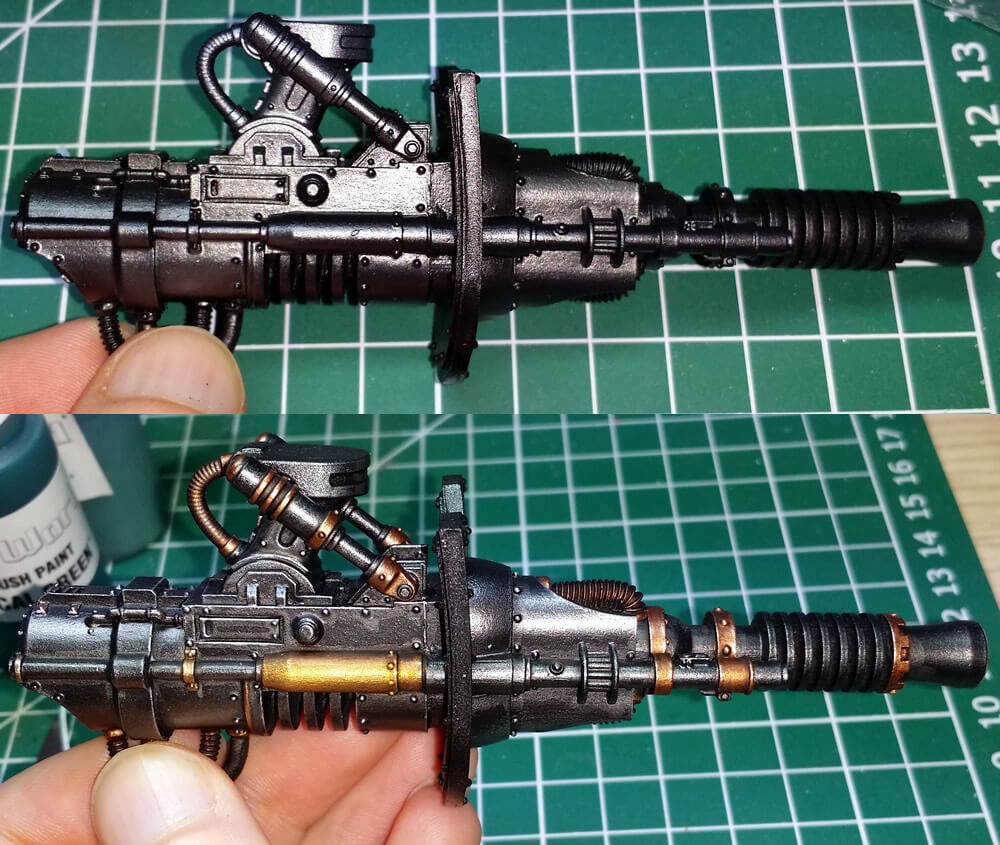 Because I’d spoken to a few people about these paints, I decided to take a couple of pictures of painting up the Lightening Cannon for the Maegera. The image to your left shows the very early and current stages of this gun.
The top-most version has received three steps – a Chaos Black undercoat, followed by an airbrush applied Vallejo Gloss Black Primer on the gun. Finally the gun has been done Vallejo Metal Color Gunmetal and the elbow joint (and pistons) were done Vallejo Air Metallic Black. The reason for using two different metals is because the skeleton of all three Knights have been done using the Metallic Black and a pre-defined set of washes and drybrushes and I want to keep a certain amount of continuity running through. Hopefully you can see how shiny the Vallejo Metal Color comes our when using the Gloss undercoat – significantly higher than I’ve ever got using any other metallic paint, plus they’re Acrylic so you can safely use them alongside your normal paint range.
It is worth noting that the gun shield isn’t painted, the reflection you can see on the edge is where I’ve used the gloss primer because it will ultimately be painted gold.
The bottom part of the image shows the current stage. Focussing on the grey-steel parts of the gun, the gunmetal layer received a drybrush of Necron Compound from the Citadel Dry range* and then a controlled wash purely where the shadows should be, building them up with four or five layers where necessary. The wash was a mix of Nuln Oil and Lahmian Medium with a tiny amount of Agrax Earthshade and Drakenhof Blue. Although you could easily use thinned Nuln Oil, I quite like that extra touch of colour as shadows aren’t black normally. The image does show quite drastically where the wash has been applied. The reason for this is because the wash is significantly more matte than the glossy metal so a photo with flash emphasises this. Once this has been finished, the whole miniature will be varnished using a satin finish and then various bits picked out using different varnishes to achieve the correct finish.
Once I was happy with the shadows, I then did another drybrush of Necron Compound and then finally some edge highlights using Vallejo Model Air Metallic Steel. VMA Steel isn’t quite as bright as Citadel Mithril Silver, but has super fine metallic pigments and beautiful to paint with in contrast to the much darker gunmetal.
Note on Citadel Dry Paints
Citadel Dry is a range of paints that are fundamentally solid in consistency (think jelly) and intended for drybrushing. When they came out they pretty much split the community as a number of painters (myself included) didn’t see the benefit for having an extra pot purely for drybrushing and felt it was a gimick to go alongside the new Games Workshop painting “methodology”.
However I have to admit that I’m a convert after a few friends used them and said how good they are. Personally the biggest benefit for me is that they’re more controllable than using a liquid paint, in that when you drybrush with a regular paint, you will often get flecks of paint spreading onto other parts of you miniature (metallics are notorious for it). This means you tend to paint in such a way that you get the drybrushing done very early on – sometimes before you really wanted to do it.
With the extra control you get from the Citadel Dry, you get a bit more flexibility with when you drybrush and I think slightly improved finish.
One disclaimer, the paint only minimises splattering flecks. If you can’t actually drybrush accurately they’re not going to make you…

Hi, really sorry about the delay, haven’t given the blog enough love over the past couple of years! The brass banding I’ve actually got written down. It’s a base of Balthasar Gold, washed with a 50/50 Agrax Earthshade/Lahmian Medium mix (twice). Once dry layer up with Balthasar Gold and then an edge highlight with Sycorax Bronze. The gold I believe was a base of Gehenna’s Gold and then washed with Seraphim Sepia – however I didn’t write that down so wouldn’t put money on it. The ribbed pipes are Warplock Bronze, washed with Agrax and then highlighted with Balthasar Gold
Love how these metallics look!
On the lightning cannon photo, are the brass and gold areas done with the vallejo metal colour paints too? I love that brass look.
If so, how did you highlight them? Also with the Necron Compound?